Elastic Stack
Elastic Stack 구조
1. Elastic Stack
- Elastic Stack 이란?
- 최초에는 ELK stack(Elasticsearch + Logstash + Kibana)로 서비스 명으로 제공 했으나 5.0.0 버전 부터 Beats를 추가하여 Elastic stack 이란 이름으로 현재 서비스가 제공

- Elatsic Stack 지금까지의 변경들
- Elastic Stack Version 공식 Blog
- Elastic Stack History
-
Elastic Stack Data Flow

- ElasticSearch
- 루씬 기반의 검색엔진이며 HTTP 웹 인터페이스와 스키마에서 자유로운 Json 문서와 함께 분산 멀티테넌트 지원 전문 검색엔진
- 시간이 갈수록 증가하는 문제를 처리하는 분산형 RESTful 검색 및 분석 엔진 데이터를 중앙에 저장하여 예상 가능한 항목을 탐색하거나 예상치 못한 항목을 밝혀낼 수 있도록 지원
- Lucene 이란
- Java로 쓰여진 검색 엔진 라이브러리
- top-level Apache project이다.
- full-text search가 용이한 라이브러리이다.
- Lucene 이란
- Logstash
- 다양한 소스에서 동시에 데이터를 수집하여 변환한 후 자주 사용하는 저장소로 전달
- Input : Beats, Cloudwatch, Eventlog 등의 다양한 입력을 지원하여 데이터 수집
- Filter : 형식이나 복잡성에 상관없이 설정을 통해 데이터를 동적으로 변환 - Plugin 종류 https://www.elastic.co/guide/en/logstash/current/filter-plugins.html
- Output : Elastic Search, Email, ECS, Kafka 등 원하는 저장소에 데이터를 전송
- Kibana
- ElasticSearch 에 저장 한 데이터를 구체적으로 시간화 해주는 도구
-
Beats
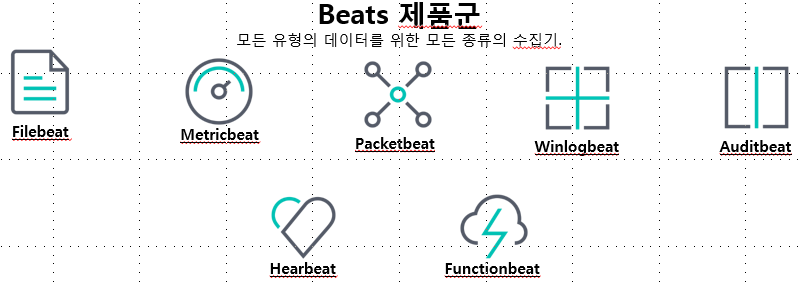
- 단말 장치의 데이터를 전송하는 경량 데이터 수집기 플랫폼
- Filebeat, Metricbeat, Packetbeat, Winlogbeat, Heartbeat 등이 있으며 Libbeat을 이용하여 직접 구축도 가능
- Packetbeat :
- 데이터 실시간 접근 내용 분석
- 응용 프로그램 서버간에 교환되는 트랜잭션에 대한 정보를 제공하는 네트워크 패킷 분석기
- 필드 : https://www.elastic.co/guide/en/beats/packetbeat/current/exported-fields.html
- Filebeat :
- 로그를 라인 별로 읽고 전달, 중단되는 경우 중단점 기억 재가동
- 일반적인 형식의 로그 데이터의 간편한 수집, 파싱, 시각화 처리
- 모듈 : https://www.elastic.co/guide/en/beats/filebeat/current/filebeat-modules.html
- Metricbeat :
- 다양한 시스템 통계 수집, 전송(Linux, Windows, Mac Host…)
- CPU 사용률, 메모리, 파일 시스템, 디스크 IO 및 Network IO 통계 제공
- 다양한 서비스의 메트릭을 수집하는 내장 모듈 제공
- 모듈 : https://www.elastic.co/guide/en/beats/metricbeat/current/metricbeat-modules.html
- 서버에서 실행중인 운영 체제 및 서비스에서 메트릭을 주기적으로 수집하는 서버 모니터링 에이전트
- Winlogbeat :
- Windows 기반 인프라의 상태 확인
- 보안로드, 장치 연결, 신규 소프트웨어 설치등 이벤트 로그를 정형화된 현식으로 수집
- 모듈 : https://www.elastic.co/guide/en/beats/winlogbeat/current/winlogbeat-modules.html
- Auditbeat :
- Auditbeat 는 Linux 감사 프레임워크와 직접 통신하여 Audit와 동일한 데이터 수집, 전송
- 파일 통합 모니터링(메타 데이터, 파일 내용으 ㅣ암호화 해쉬등)
- 모듈 : https://www.elastic.co/guide/en/beats/auditbeat/current/auditbeat-modules.html
- Hearbeat :
- 서비스 동작, 가동 및 반응 시간
- LoadBalancing 적용된 서버 호스트를 DNS 분석 기접을 통해 모니터링
- 모니터링 대상의 추가 및 제거 프로세스 자동화
- Packetbeat :
- X-Pack Elastic Stack의 확장 Pack (유료)
- Security, Alerting, Monitoring, Repoting, Graph, Machine Learing 등 확장된 기능 제공
- Elastic Stack 6.8 / 7.1 Version 이후 Security 및 일부 X-Pack 을 무료로 사용 가능
- Elastic Cloud(유료)
- AWS Elasticsearch Service 와 별도의 서비스로 Elastic 에서 제공 하는 모든 기능을 로드한 제품
- Support Matrix
2. Elastic Search 특장점
- Near Realtime(NRT)
- 데이터 색인 (=Indexing) 후 약 1초 (=Near Realtime) 후부터 검색 결과에 반영된다 (≠ 처리 시간)

- refresh 주기
- 설정: index.refresh_interval
- 기본값 : 1s
- refresh 주기를 늘리면, indexing throughput을 높일 수 있다(refresh에 쓰이는 자원을 indexing에 사용할 수 있으므로)
- refresh 강제 적용
POST /_refresh
- 데이터 색인 (=Indexing) 후 약 1초 (=Near Realtime) 후부터 검색 결과에 반영된다 (≠ 처리 시간)
- 검색 속도 빠름
- Apache Lucene기반의 오픈소스 ‘검색엔진’
- (기본적으로) 모든 Field에 대해 Indexing 처리하므로 검색 처리 시간이 짧다
- 모든 열을 찾아보는 대신에, 인덱스(색인)를 이용해서 어떤 문서나 열에 해당되는지 찾을 수 있음
- 문자들을 유연하게 토큰화하고 인덱싱하는데 특화
 EX) "Hello to the world"라는 하나의 문자열을 다양한 방법으로 인덱싱

  1. ["Hello to the world"]를 통채로 할 수 도 있고,
  2. ["hello", "to", "the", "world"] 각각의 단어들로 할 수 도있고,
  3. ["hello", "world"] 의미있는 단어로만 할 수 도 있음
  4. 그리고, 사용자가 원하는 규칙에 따라 다른 방식도 만들어 낼 수 있습니다. 예를들어 "to"라는 전치사를 중요하게 생각한다면 추가 시킬 수도 있습니다.

  이렇게 토큰화된 단어들이 인덱스 키가 되어 훨씬 빠르고 효율적인 문서 검색을 진행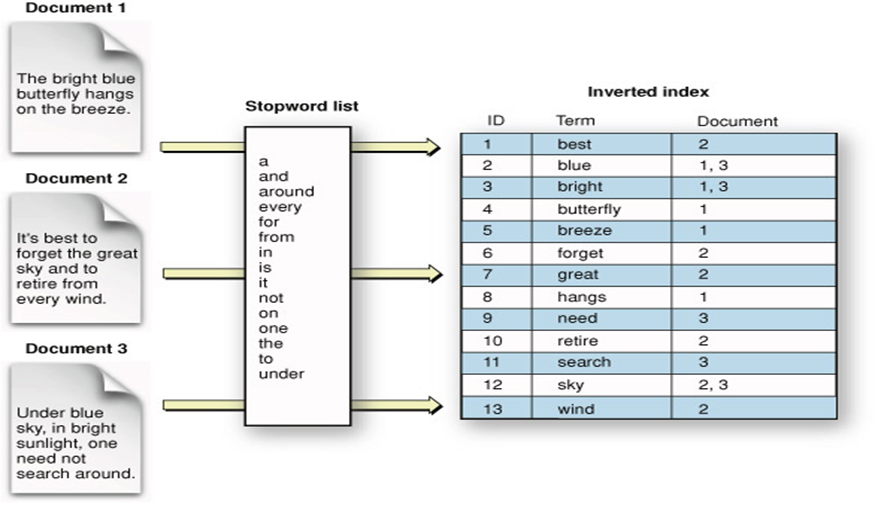
위에 사진을 보면 어떤 방식으로 문자열 (혹은 문서)가 단어별로 인덱싱되어 저장되는지 알 수 있습니다. 관사나 전치사등을 제외한 유의미한 키워드들을 추리고, 각 키워드가 어떤 Document에 저장되어 있는지 저장합니다. 이제 'best'라는 키워드로 검색을 진행하면 Document 2에서 best 라는 키워드가 사용되었음을 바로 알 수 있습니다. (만약 이를 선형 검색으로 진행한다면 Document 1, Document 2, Document 3에 모든 단어들을 하나씩 비교대조하여 찾아봐야 하겠죠?). 이런 구조라면 하나의 키워드를 찾을 때 마치 해쉬(hash) 테이블을 이용하는 것처럼 시간복잡도는 O(1)에 수렴하게 됩니다. 바로 실시간 검색이 가능한 이유입니다. -
Field Indexing 제외

- 확장성(Scalability)
-
운영 중인 elasticsearch cluster에 간단한 설정을 통해 elasticsearch node 추가 가능
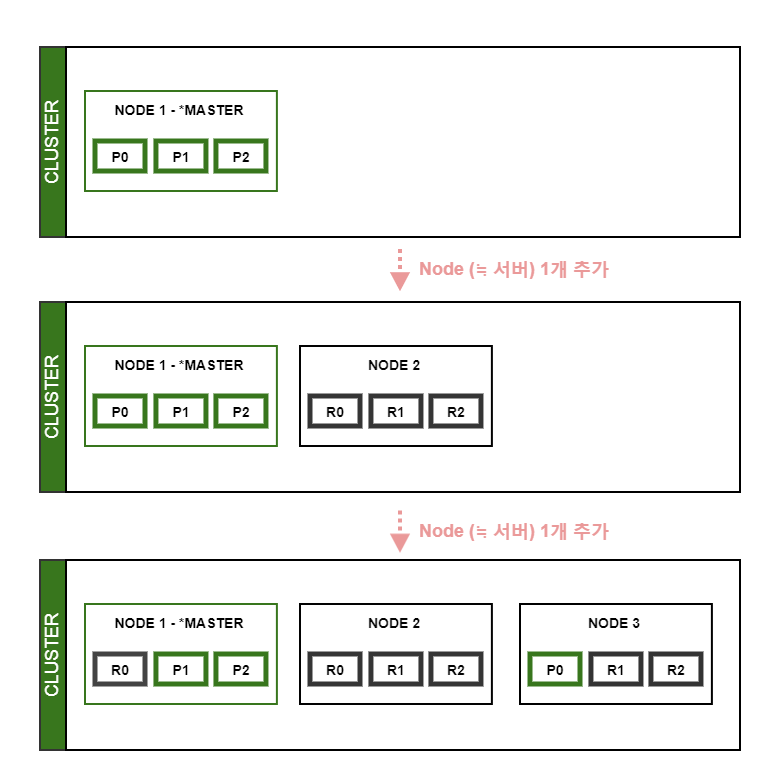
-
- 분산 작업
-
Index (≒데이터)를 shards(≒조각)로 세분화하여 여러 operations 성능 향상
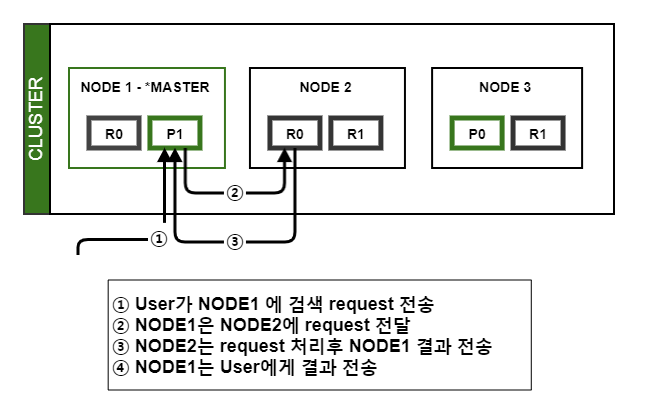
-
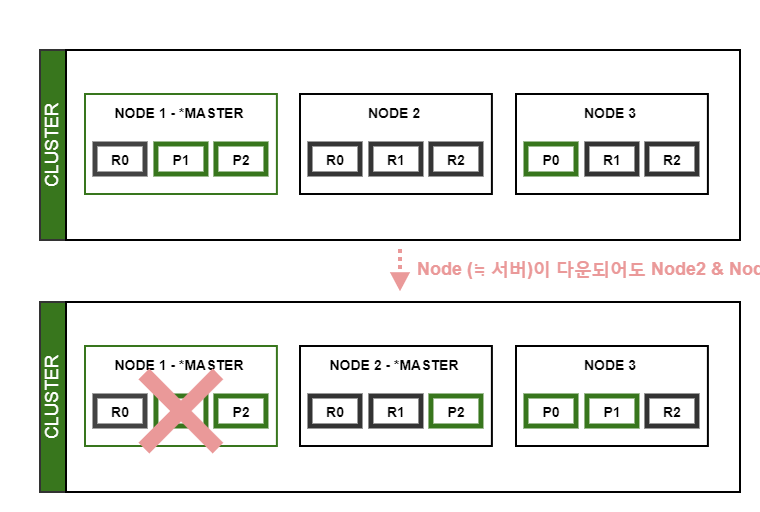
- 안정성
-
(Replica Shards를 설정을 통해) 특정 Node (≒서버)가 다운되어도 데이터 유실 없이 운영할 수 있다
-
-
용어 정리
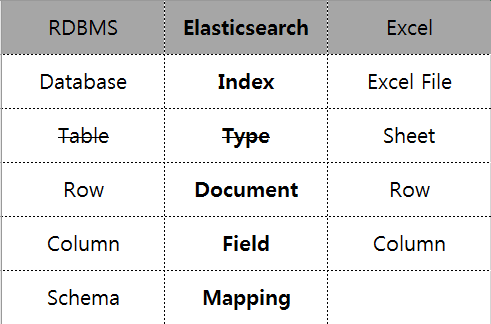
- 위의 비교는 어디까지나 이해를 돕기 위할 목적일 뿐 정확히 일치하지는 않는다
- 6.0.0 이후에는 Index 1개에 Type 1개가 되어 사실상 폐지 ♕ (7.0 이후 완전 폐지)
3. Elastic Search 설치 및 Data 처리
-
Java 8 이상 필요https://www.elastic.co/kr/support/matrix#matrix_jvm
# java -version java version "1.8.0_231" Java(TM) SE Runtime Environment (build 1.8.0_231-b11) Java HotSpot(TM) Client VM (build 25.231-b11, mixed mode) -
Elastic Search Download(with Linux & gz.tar)
# wget https://artifacts.elastic.co/downloads/elasticsearch/elasticsearch-7.4.1-linux-x86_64.tar.gz # tar -xzf elasticsearch-7.4.1-linux-x86_64.tar.gz -
Elastic Search 실행
# cd elasticsearch-7.4.1/ # ./bin/elasticsearch -
Elastic Search 실행 확인
# curl -XGET http://localhost:9200/ { "name" : "localhost", "cluster_name" : "tesT_clu", "cluster_uuid" : "McwY1YurTf-x7EGtioZYzA", "version" : { "number" : "7.4.1", "build_flavor" : "default", "build_type" : "zip", "build_hash" : "fc0eeb6e2c25915d63d871d344e3d0b45ea0ea1e", "build_date" : "2019-10-22T17:16:35.176724Z", "build_snapshot" : false, "lucene_version" : "8.2.0", "minimum_wire_compatibility_version" : "6.8.0", "minimum_index_compatibility_version" : "6.0.0-beta1" }, "tagline" : "You Know, for Search" } -
Elastic Search Daemon 실행 방법
# ./bin/elasticsearch -d -p pid -
Elastic Search 종료
# kill {pid} - Data Insert
- Insert Query
# curl -XPOST http://localhost:9200/books/book/1 -d '{ "tile": "ElasticSearch Test", "Name": "lyn2imi", "date": "2019-10-31", "pages": 250 }' {"error":"Content-Type header [application/x-www-form-urlencoded] is not supported","status":406}- Elasticsearch 6.0 이후 버전에 도입된 엄격한 content-type 확인으로 인해서 추가해야 함
# curl -XPOST http://localhost:9200/books/book/1 -H 'Content-Type: application/json' -d '{ "tile": "ElasticSearch Test", "Name": "lyn2imi", "date": "2019-10-31", "pages": 250 }' {"_index":"books","_type":"book","_id":"1","_version":1,"result":"created","_shards":{"total":2,"successful":1,"failed":0},"_seq_no":0,"_primary_term":1} - 데이터 Delete
- Delete Query (Document)
# curl -XDELETE http://localhost:9200/books/book/1 {"_index":"books","_type":"book","_id":"1","_version":1,"result":"deleted","_shards":{"total":2,"successful":1,"failed":0},"_seq_no":1,"_primary_term":1}- Delete 확인(Document)
# curl -XGET http://localhost:9200/books/book/1?pretty { "_index" : "books", "_type" : "book", "_id" : "1", "found" : false }- 삭제된 Document id에 다시 Document를 추가
- Version 이 증가 된 것을 알수 있다
- Document단위로 데이터를 삭제하더라도 Document의 Metadata는 여전히 남아있음
- Index 단위로 삭제하는 경우 Metadata까지 모두 삭제
- 실제로 삭제되는 것이 아니라 Document의 _source에 입력된 데이터 값을 Empty값으로 업데이트되고 검색되지 않게 상태 변경
# curl -XPOST http://localhost:9200/books/book/1 -H 'Content-Type: application/json' -d '{ "tile": "ElasticSearch Test", "Name": "lyn2imi", "date": "2019-10-31", "pages": 250 }' {"_index":"books","_type":"book","_id":"1","_version":2,"result":"created","_shards":{"total":2,"successful":1,"failed":0},"_seq_no":4,"_primary_term":1}- Index 단위 삭제 후 URL로 접근하면 404반환
# curl -XDELETE http://localhost:9200/books/ {"acknowledged":true} # curl -XGET http://localhost:9200/books/book/1?pretty { "error" : { "root_cause" : [ { "type" : "index_not_found_exception", "reason" : "no such index [books]", "resource.type" : "index_expression", "resource.id" : "books", "index_uuid" : "_na_", "index" : "books" } ], "type" : "index_not_found_exception", "reason" : "no such index [books]", "resource.type" : "index_expression", "resource.id" : "books", "index_uuid" : "_na_", "index" : "books" }, "status" : 404 } - Data Update
- _update API는 Document의 구조를 변경하는 것이 아님
- 기존의 저장된 Document 값을 읽어 입력한 명령을 토대로 새로 변경된 Document 내용을 만들고 입력하는 방식
# curl -XPOST http://localhost:9200/books/book/1 -H 'Content-Type: application/json' -d '{
"tile": "ElasticSearch Test",
"Name": "lyn2imi",
"date": "2019-10-31",
"pages": 250
}'

{"_index":"books","_type":"book","_id":"1","_version":1,"result":"created","_shards":{"total":2,"successful":1,"failed":0},"_seq_no":0,"_primary_term":1}
# curl -XPOST http://localhost:9200/books/book/1/_update -H 'Content-Type: application/json' -d '{ "doc": { "company": "company" } }' {"_index":"books","_type":"book","_id":"1","_version":2,"result":"updated","_shards":{"total":2,"successful":1,"failed":0},"_seq_no":1,"_primary_term":1}# curl -XGET http://localhost:9200/books/book/1?pretty { "_index" : "books", "_type" : "book", "_id" : "1", "_version" : 2, "_seq_no" : 1, "_primary_term" : 1, "found" : true, "_source" : { "tile" : "ElasticSearch Test", "Name" : "lyn2imi", "date" : "2019-10-31", "pages" : 250, "company" : "company" } } - 파일을 통한 데이터 처리
- –data-binary @파일명
- 입력할 데이터를 모아 한꺼번에 처리하므로 데이터를 각각 처리하고 결과를 반환할 때보다 속도가 매우 빠름
- 많은 Document를 한꺼번에 색인할 때 벌크를 사용하면 색인에 소요되는 시간을 크게 줄임
- Action Meta data와 Request Body가 각각 한 쌍씩 묶여 동작
- Delete는 Action Meta data만 필요
-
통상적으로 1000~5000개 정도의 작업이 바람직, 10000개 이상의 작업을 배치로 실행하면 오류가 발생할 확률이 높음
- Bulk 파일 생성
# vi bulk_test.sql { "index" : { "_index" : "bulk_test", "_type" : "_doc", "_id" : "1" } } { "field1" : "value1" } { "delete" : { "_index" : "bulk_test", "_type" : "_doc", "_id" : "2" } } { "create" : { "_index" : "bulk_test", "_type" : "_doc", "_id" : "3" } } { "field1" : "value3" } { "update" : {"_id" : "1", "_type" : "_doc", "_index" : "bulk_test"} } { "doc" : {"field2" : "value2"} }- Bulk 파일 일 Insert
# curl -XPOST http://10.20.83.146:9200/_bulk --data-binary @./bulk_test.sql -H 'Content-Type: application/json' {"took":762,"errors":false,"items":[{"index":{"_index":"bulk_test","_type":"_doc","_id":"1","_version":1,"result":"created","_shards":{"total":2,"successful":1,"failed":0},"_seq_no":0,"_primary_term":1,"status":201}},{"delete":{"_index":"bulk_test","_type":"_doc","_id":"2","_version":1,"result":"not_found","_shards":{"total":2,"successful":1,"failed":0},"_seq_no":1,"_primary_term":1,"status":404}},{"create":{"_index":"bulk_test","_type":"_doc","_id":"3","_version":1,"result":"created","_shards":{"total":2,"successful":1,"failed":0},"_seq_no":2,"_primary_term":1,"status":201}},{"update":{"_index":"bulk_test","_type":"_doc","_id":"1","_version":2,"result":"updated","_shards":{"total":2,"successful":1,"failed":0},"_seq_no":3,"_primary_term":1,"status":200}}]}- bulk_test INDEX 에 Data 확인
# curl -XGET http://10.20.83.146:9200/bulk_test/_doc/1?pretty
{
  "_index" : "bulk_test",
  "_type" : "_doc",
  "_id" : "1",
  "_version" : 2,
  "_seq_no" : 3,
  "_primary_term" : 1,
  "found" : true,
  "_source" : {
    "field1" : "value1",
    "field2" : "value2"
  }
}
# curl -XGET http://10.20.83.146:9200/bulk_test/_doc/2?pretty { "_index" : "bulk_test", "_type" : "_doc", "_id" : "2", "found" : false }# curl -XGET http://10.20.83.146:9200/bulk_test/_doc/3?pretty { "_index" : "bulk_test", "_type" : "_doc", "_id" : "3", "_version" : 1, "_seq_no" : 2, "_primary_term" : 1, "found" : true, "_source" : { "field1" : "value3" } }
4. Elastic Search Cluster 구성
- Cluster 와 Node
- 하나의 Cluster는 여러 개의 Node로 구성
- 클러스터명만 같게 유지하고 프로세스만 실행하면 시스템의 확장이 가능
-
Node 종류
- Master Node
- 전체 Cluster의 상태에 대한 Meta 정보를 관리하는 Node
- 기존 Master Node가 종료되면 새로운 Master Node가 선출
- node.master를 false로 하면 Master Node에서 제외
- Data Node
- 색인된 데이터를 실제로 저장하는 Node
- node.data 속성을 false로 지정하면 해당 Node는 데이터를 저장하지 않는다.
- Ingest Node mode
- 다양한 형태의 데이터를 색인할 때 데이터의 전처리를 담당
- pre processing 파이프라인을 실행하고 하나 또는 하나 이상의 ingest processor들을 모으는 작업
- 5.0 Version 이후 부터 적용 됨
- Machine Learning Node
- X-Pack 유료 기능중 하나인 Machine Learning 관련 처리
- Coordinate Node
- Client 로 부터의 request 핸들링
- request 처리의 부하를 분산
- 10개 이상의 Node로 구성된 Cluster인 경우 Master 전용 Node와 Data 전용 노드를 분리하는 것이 좋다.
- Master Node
-
Cluster 구성
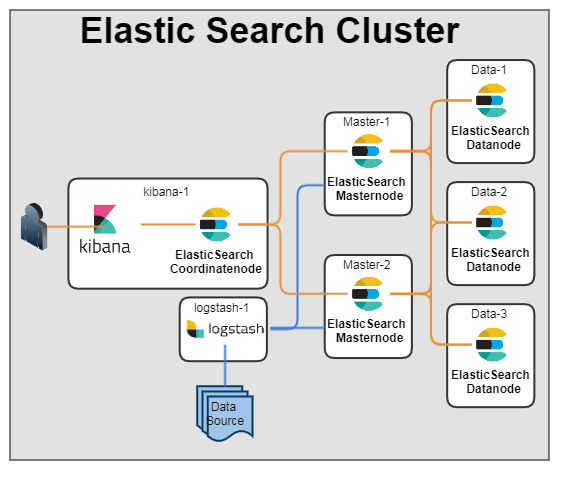
- 실제 구성 시에는 3개의 마스터 노드 필요
- 노드 중 하나에 장애가 발생하더라도 여전히 나머지 두 개로 안전하게 쿼럼을 형성하고 계속 진행할 수 있습니다. 클러스터에 마스터 적격 노드가 3개 미만인 경우, 이 중 하나의 손실도 허용될 수 없습니다. 이와 반대로 클러스터에 마스터 적격 노드가 3개보다 훨씬 많은 경우, 선출과 클러스터 상태 업데이트에 시간이 더 걸릴 수 있습니다.
-
Coordinate Node Config
cluster.name: elastic_clu node.name: kibana-1 node.master: false node.data: false node.ingest: false cluster.remote.connect: false bootstrap.memory_lock: true bootstrap.system_call_filter: false network.host: localhost transport.host: kibana-1 transport.tcp.port: 7400 transport.compress: true http.port: 7200 discovery.seed_hosts: ["Master-1:7400", "Master-2:7400", "Data-1:7400", "Data-2:7400", "Data-3:7400"] cluster.initial_master_nodes: ["Master-1","Master-2"] ---------------------- cluster.name : Cluster 이름 node.master : Master Node 여부 node.data : Data Node 여부 node.ingest : Ingest Node 여부 cluster.remote.connect : 원격 클러스터에 연결 여부 bootstrap.memory_lock : ElasticSearch가 사용하고 있는 메모리 Lock bootstrap.system_call_filter : seccomp(Secure Computing Mode) 제한 여부 network.host : 바인딩하거나 외부 노드와 통신할 때 사용 transport.host : Node 간 내부 통신 Host transport.tcp.port : Node 간 내부 통신 TCP Port transport.compress : Node 간 내부 통신 압축 여부 http.port : ElasticSearch API Port discovery.seed_hosts : Cluster 구성을 위한 Seed Node 정보 cluster.initial_master_nodes : Cluster 시작 시 명시된 노드들을 마스터 노드로 선출 -
Master Node Config
- Master-1 cluster.name: elastic_clu node.name: Master-1 node.master: true node.data: false node.ingest: false cluster.remote.connect: false bootstrap.memory_lock: true bootstrap.system_call_filter: false network.host: 0.0.0.0 transport.host: Master-1 transport.tcp.port: 7400 transport.compress: true http.port: 7200 discovery.seed_hosts: ["Master-1:7400", "Master-2:7400", "Data-1:7400", "Data-2:7400", "Data-3:7400"] cluster.initial_master_nodes: ["Master-1","Master-2"] - Master-2 cluster.name: elastic_clu node.name: Master-2 node.master: true node.data: false node.ingest: false cluster.remote.connect: false bootstrap.memory_lock: true bootstrap.system_call_filter: false network.host: 0.0.0.0 transport.host: Master-2 transport.tcp.port: 7400 transport.compress: true http.port: 7200 discovery.seed_hosts: ["Master-1:7400", "Master-2:7400", "Data-1:7400", "Data-2:7400", "Data-3:7400"] cluster.initial_master_nodes: ["Master-1","Master-2"] -
Data Node Config
- Data-1

cluster.name: elastic_clu
node.name: Data-1
node.master: false
node.data: true
node.ingest: false
cluster.remote.connect: false
bootstrap.memory_lock: true
bootstrap.system_call_filter: false
network.host: 0.0.0.0
transport.host: Data-1
transport.tcp.port: 7400
transport.compress: true
http.port: 7200
discovery.seed_hosts: ["Master-1:7400", "Master-2:7400", "Data-1:7400", "Data-2:7400", "Data-3:7400"]
cluster.initial_master_nodes: ["Master-1","Master-2"]

- Data-2

cluster.name: elastic_clu
node.name: Data-2
node.master: false
node.data: true
node.ingest: false
cluster.remote.connect: false
bootstrap.memory_lock: true
bootstrap.system_call_filter: false
network.host: 0.0.0.0
transport.host: Data-2
transport.tcp.port: 7400
transport.compress: true
http.port: 7200
discovery.seed_hosts: ["Master-1:7400", "Master-2:7400", "Data-1:7400", "Data-2:7400", "Data-3:7400"]
cluster.initial_master_nodes: ["Master-1","Master-2"]

- Data-3

cluster.name: elastic_clu
node.name: Data-3
node.master: false
node.data: true
node.ingest: false
cluster.remote.connect: false
bootstrap.memory_lock: true
bootstrap.system_call_filter: false
network.host: 0.0.0.0
transport.host: Data-3
transport.tcp.port: 7400
transport.compress: true
http.port: 7200
discovery.seed_hosts: ["Master-1:7400", "Master-2:7400", "Data-1:7400", "Data-2:7400", "Data-3:7400"]
cluster.initial_master_nodes: ["Master-1","Master-2"]
- Kibana-1 server.port: 7601 server.host: "localhost" elasticsearch.hosts: ["http://localhost:7200"]
5. Elastic Search 운영 관리
- Scale Out
- Cluster Node 추가
- 동일한 cluster.name 으로 구성시 자동으로 Cluster 가입
- Master 선출
https://www.elastic.co/guide/en/elasticsearch/reference/master/modules-discovery-settings.html
- discovery.seed_hosts : Cluster 에서 Master Node 목록 , Host:Port
- discovery.seed_providers : Master Node 목록 주소를 얻을때 사용 하는 제공자 유형
- cluster.initial_master_nodes : 초기 Master Node 설정
- Cluster Node Upgrade
https://www.elastic.co/guide/en/elasticsearch/reference/current/rolling-upgrades.html
- rolling Upgrade
- 지원 Version : 5.6에서 6.8로, 6.8에서 7.4.1로 가능하며, 6.7 이하에서 직접 7.4.1로 업그레이드하려면 전체 클러스터를 다시 시작 해야합니다.
- 사전 수행
- 지원 중단 기능 확인 하여 사용 중단된 기능을 사용 하고 있는지 확인
- 주요변경 사항 검토
- Plug-in 을 사용 하는 경우 Version 호환 되는 플러그인인지 확인
- Cluster upgrade 하기 전 사전 Upgrade Test
- 스냅샷으로 데이터를 백업
- Upgrade 실행
- Upgrade Node의 Shard 할당 비할성화
PUT _cluster/settings { "persistent": { "cluster.routing.allocation.enable": "primaries" } }- 불필요한 색인 생성을 중지하고 동기화 된 플러시를 수행
POST _flush/synced- Node 종료
- Node Upgrade
- Plug-in Upgrade
- Shard 할당 활성화
PUT _cluster/settings { "persistent": { "cluster.routing.allocation.enable": null } }- Node가 정상화 될때까지 대기
GET _cat/health?v GET _cat/recovery- 나머지 Node 를 1번 부터 반복
- rolling Upgrade
- Cluster Node 추가
6. Elastic Search Shard
- Shard 개수에 따른 처리 속도
- Shard 란?
- 샤드는 검색 엔진인 루씬의 인스턴스
- 방대한 양의 데이터를 저장할 때 색인을 이른바 샤드(shard)라는 조각으로 분할
- 단일 노드의 디스크에서 수용하지 못하거나 검색 요청 처리 시 속도가 느려지는 것을 방지
- Shard의 개수는 index를 생성할 때 결정되며 바꿀 수 없음
- Cluster 에 Node 가 추가되면 새로운 노드로 Shard가 재할당 됨
- 최상의 Shard 수는 ?
- ElasticSearch 의 검색은 1 Query, 1 Shard, 1 Thread(CPU)를 바탕으로 발생
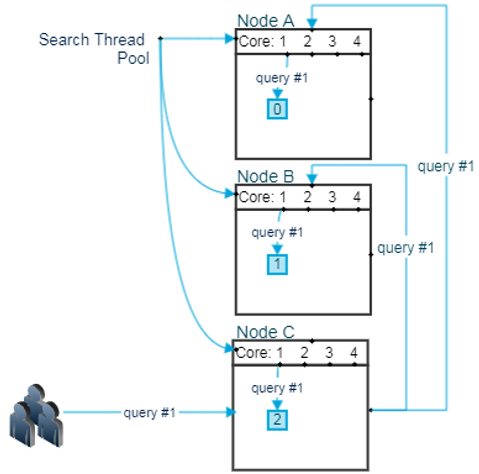
- 한개의 query가 Node 로 전달 되고 Thread 를 사용하는 과정
- 총 3대의 Node엑서 각 Shard 1개씩 할당되었으며, 각 Node 에 4개의 Core를 가지고 있음
- 위 그림에서 보이는 것 처럼 사용자가 query #1를 Node 에 보냅니다. Node C는 Node A와 Node B에게 자신이 받은 query #1를 전달.
- 각각의 Node는 자신이 가지고 있는 Shard에게 query #1을 전달하게 되고 이때 검색 해야 할 Shard 의 수가 하나 이기 때문에 4의 Thread Pool에서 1개의 Thread 를 사용하여 쿼리를 실행
- 각각의 Node는 Shard 가 하나씩 이기 때문에 Thread를 하나만 하용 하게 되고 나머지 3개의 Thread 는 놀게 됨
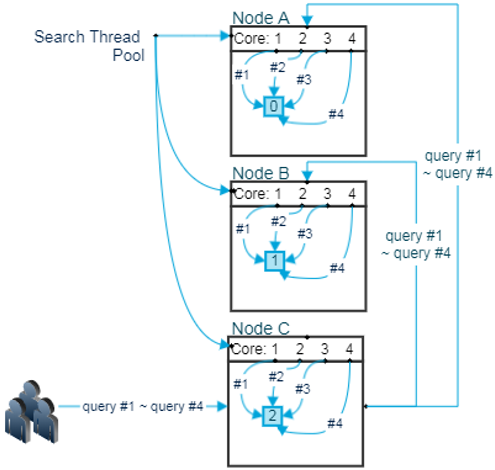
- Node 당 Shard 가 1개일 때 4개의 query가 동시에 인입될 경우
- Node C에서 4개의 query 가 인입 되고 각 Node 의 Shard 는 하나이기 때문에 query 하나 당 Thread 하나씩을 나눠서 실행
- 동시에 실행된 query 는 거의 동시에 종료
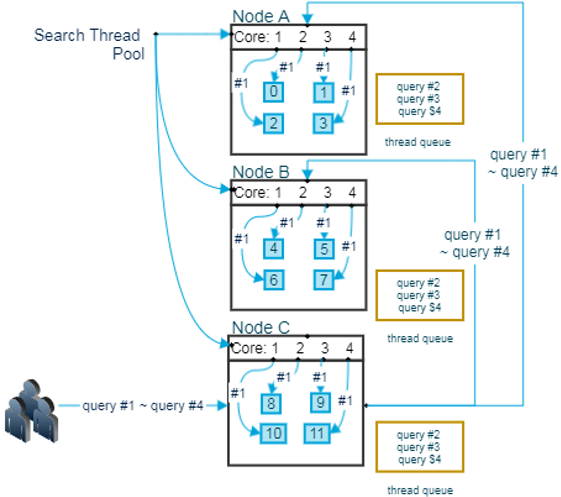
- Node 당 Shard 가 4개 일때 4개의 query가 동시 인입될 경우
- query #2 ~ query#4의 경우는 응답 경과가 느려지게 됨
- 먼저 처리된 query의 나중에 처리된 query 사이의 응답 속도 차가 점점 벌어 지게 됨
- 그리고 너무 많은 양의 입입될 경우 queue가 꽉 차서 rejected 현상 발생
-
이렇게 떨어진 응답 속도는 query 자체의 문제가 아니고 thread 경합의 문제이기 때문에 slowlog에도 남지 않음
- Shard 의 수가 너무 적으면 단일 query의 응답 속도는 느려 질수 있으나 대량의 query가 인입될 경우 고른 성능을 보여줄 수 있고, shard 수가 너무 많으면 단일 query의 응답 속도는 빠를 수 있으나 대량의 query 가 인입될 경우 query 별 성능 차이가 심해줄수 있음
- 최적의 Shard 개수
- 작은 Shard 는 작은 segment를 만들며 부하를 증가 시킴
- 평균 Shard 크기는 최소한 수 GB 와 수십 GB 사이를 유지(대략 20GB ~ 40GB 가 적당)
- 하나 의 Node에 저장할수 있는 Shard 개수는 가용한 Heap의 크기와 비례하지만, ElasticSearch 에서 그 크기를 제한 하고 있지는 않음
- 하나의 Node 에 설정 한 Heap 1GB 당 20개 정도가 적당한 Size 이며, 따라서 30GB heap을 가진 Node는 최대 600개 정도의 Shard를 가지는 것이 가능 하지만, 이보다 적게 유지 하는 것이 좋음
- 쿼리 성능 관점에서 최대 샤드 크기를 결정하는 최고의 방법은 실제 데이터와 쿼리로 벤치마크 테스트를 해보는 것
- ES 6.7 이상 부터는 ILM(index lifecycle management)로 Index(Shard) Size 를 일정 Size 크기로 관리 할수 있어 해당 설정을 활용하는 것이 좋음
- Shard 란?
7. Elastic Search ILM
-
ILM 이란 : ElasticSearch 의 Index 의 수명 주기 관리
-
Node의 hot, warm, cold 설정
Command : bin/elasticsearch -Enode.attr.data=hot bin/elasticsearch -Enode.attr.data=warm bin/elasticsearch -Enode.attr.data=cold - ILM 정책 구성:
- ILM 정책은 원하는 수만큼 많은 Index에서 재사용 할수 있음
- ILM 정책은 Hot, Warm, Cold 및 Delete의 네가지 기본 단계로 나뉘어 짐
- 정책의 모든 단계를 정의 할 필요 없으며, 정의 되지 않은 단계는 생략 되어지며, 순서대로 단계를 실행
- Hot-Warm-Cold 아키텍처의 경우 할당 작업을 통해 Hot Node에서 Warm Node로, Warm Node에서 Cold Node로 데이터를 이동 하도록 구성 할 수 있음
- rollover 작업은 Index간 크기 또는 기간을 관리하는데 사용(https://www.elastic.co/guide/en/elasticsearch/reference/7.4/_actions.html#ilm-rollover-action)
- 강제 병합 작업은 Index를 최적화 하는데 사용 할수 있음(https://www.elastic.co/guide/en/elasticsearch/reference/7.4/_actions.html#ilm-forcemerge-action)
- 고정 작업은 Cluster의 메모리 부담을 줄이는데 사용(https://www.elastic.co/guide/en/elasticsearch/reference/7.4/_actions.html#ilm-freeze-action)
-
ILM 기본 정책:
PUT /_ilm/policy/my_policy { "policy":{ "phases":{ "hot":{ "actions":{ "rollover":{ "max_size":"50gb", "max_age":"30d" } } } } } }- 위 정책은 30일 후 또는 Index의 크기가 50gb 에 도달 하면(기본 Shard를 기준) Index를 rollover 하고새 Index에 쓰기 시작한다는 설정
-
ILM 및 Index template
PUT _template/my_template { "index_patterns": ["test-*"], "settings": { "index.lifecycle.name": "my_policy", "index.lifecycle.rollover_alias": "test-alias" } }- 위 ILM 정책을 Index template에 연결 해야 함
- rollover 작업을 사용 할때는 ILM 정책을 Index에 직접 지정하는 것이 아니라 Index template에 지정 해야 함,
- rollover 작업이 포함된 정책의 경우, Index template을 생성한 후 쓰기 별칭으로 Index를 Bootstrap 해야 함
PUT test-000001 { "aliases": { "test-alias":{ "is_write_index": true } } }- test-*로 시작하는 모든 새 Index가 30일후 또는 50GB에 도달한 후 자동으로 rollover 됨
- max_size가 포함된 rollover 관리형 Index를 사용하면 Index의 Shard 수를 크게 줄일수 있음
-
hot-warm-cold에 맞게 ILM 정책 최적화
PUT _ilm/policy/hot-warm-cold-delete-60days { "policy": { "phases": { "hot": { "actions": { "rollover": { "max_size":"50gb", "max_age":"30d" }, "set_priority": { "priority": 50 } } }, "warm": { "min_age": "7d", "actions": { "forcemerge": { "max_num_segments": 1 }, "shrink": { "number_of_shards": 1 }, "allocate": { "require": { "data": "warm" } }, "set_priority": { "priority": 25 } } }, "cold": { "min_age": "30d", "actions": { "set_priority": { "priority": 0 }, "freeze": {}, "allocate": { "require": { "data": "cold" } } } }, "delete": { "min_age": "60d", "actions": { "delete": {} } } } } }- ILM Hot - Warm - Cold ?(https://www.elastic.co/kr/blog/implementing-hot-warm-cold-in-elasticsearch-with-index-lifecycle-management)
- Hot :
- 이 Index 는 다른 Index 보다 먼저 복구 되도록 Index 우선순위를 높은 값으로 설정
- 설정된 max_size, max_age(둘중 먼저 충족된 조건적용) Index 가 rollover 되고 새 Index 가 생성 되며, 이 새 Index는 정책을 처음부터 다시 시작 함
- 현재 Index(방금 rollover 된 Index)는 rollover된 후 최대 7일 동안 기다렸다가 warm 단계로 진입
- Warm :
- Index가 warm 단계로 진입하면 ILM이 Index를 Shard 1개로 축소하고, Index를 세그먼트 1개로 병합
- Hot 보다 낮은 값으로 Index 우선 순위를 설정 하여 할당 작업을 통해 Index를 Warm Node로 이동 함
- 이동 완료 되면 30일(rollover된 후)을 기다렸다가 Cold 단계로 진입
- Cold :
- Index가 Cold 단계로 진입 하면 ILM이 다시 한번 Index 우선순위를 낮춰 Hot 및 Warm Index가 먼저 복구 되도록 함
- Index를 고정 하고 Cold Node 로 옮김
- 이동이 완료 되면 60일(rollover된 후)을 기다렸다가 delete 단계로 진입
- Delete :
- Delete 단계는 Index를 삭제 작업
- 주어진 기간 동안 Index가 Hot, Warm 또는 Cold 단계에 유지될수 있도록 항상 삭제 단계 에 대한 min_age를 지정 해야 함
- Kibana를 통한 ILM 정책 생성
- Command를 통한 정책 설정 외에도 Kibana 를 통해 손쉽게 정책을 설정 할수 있음
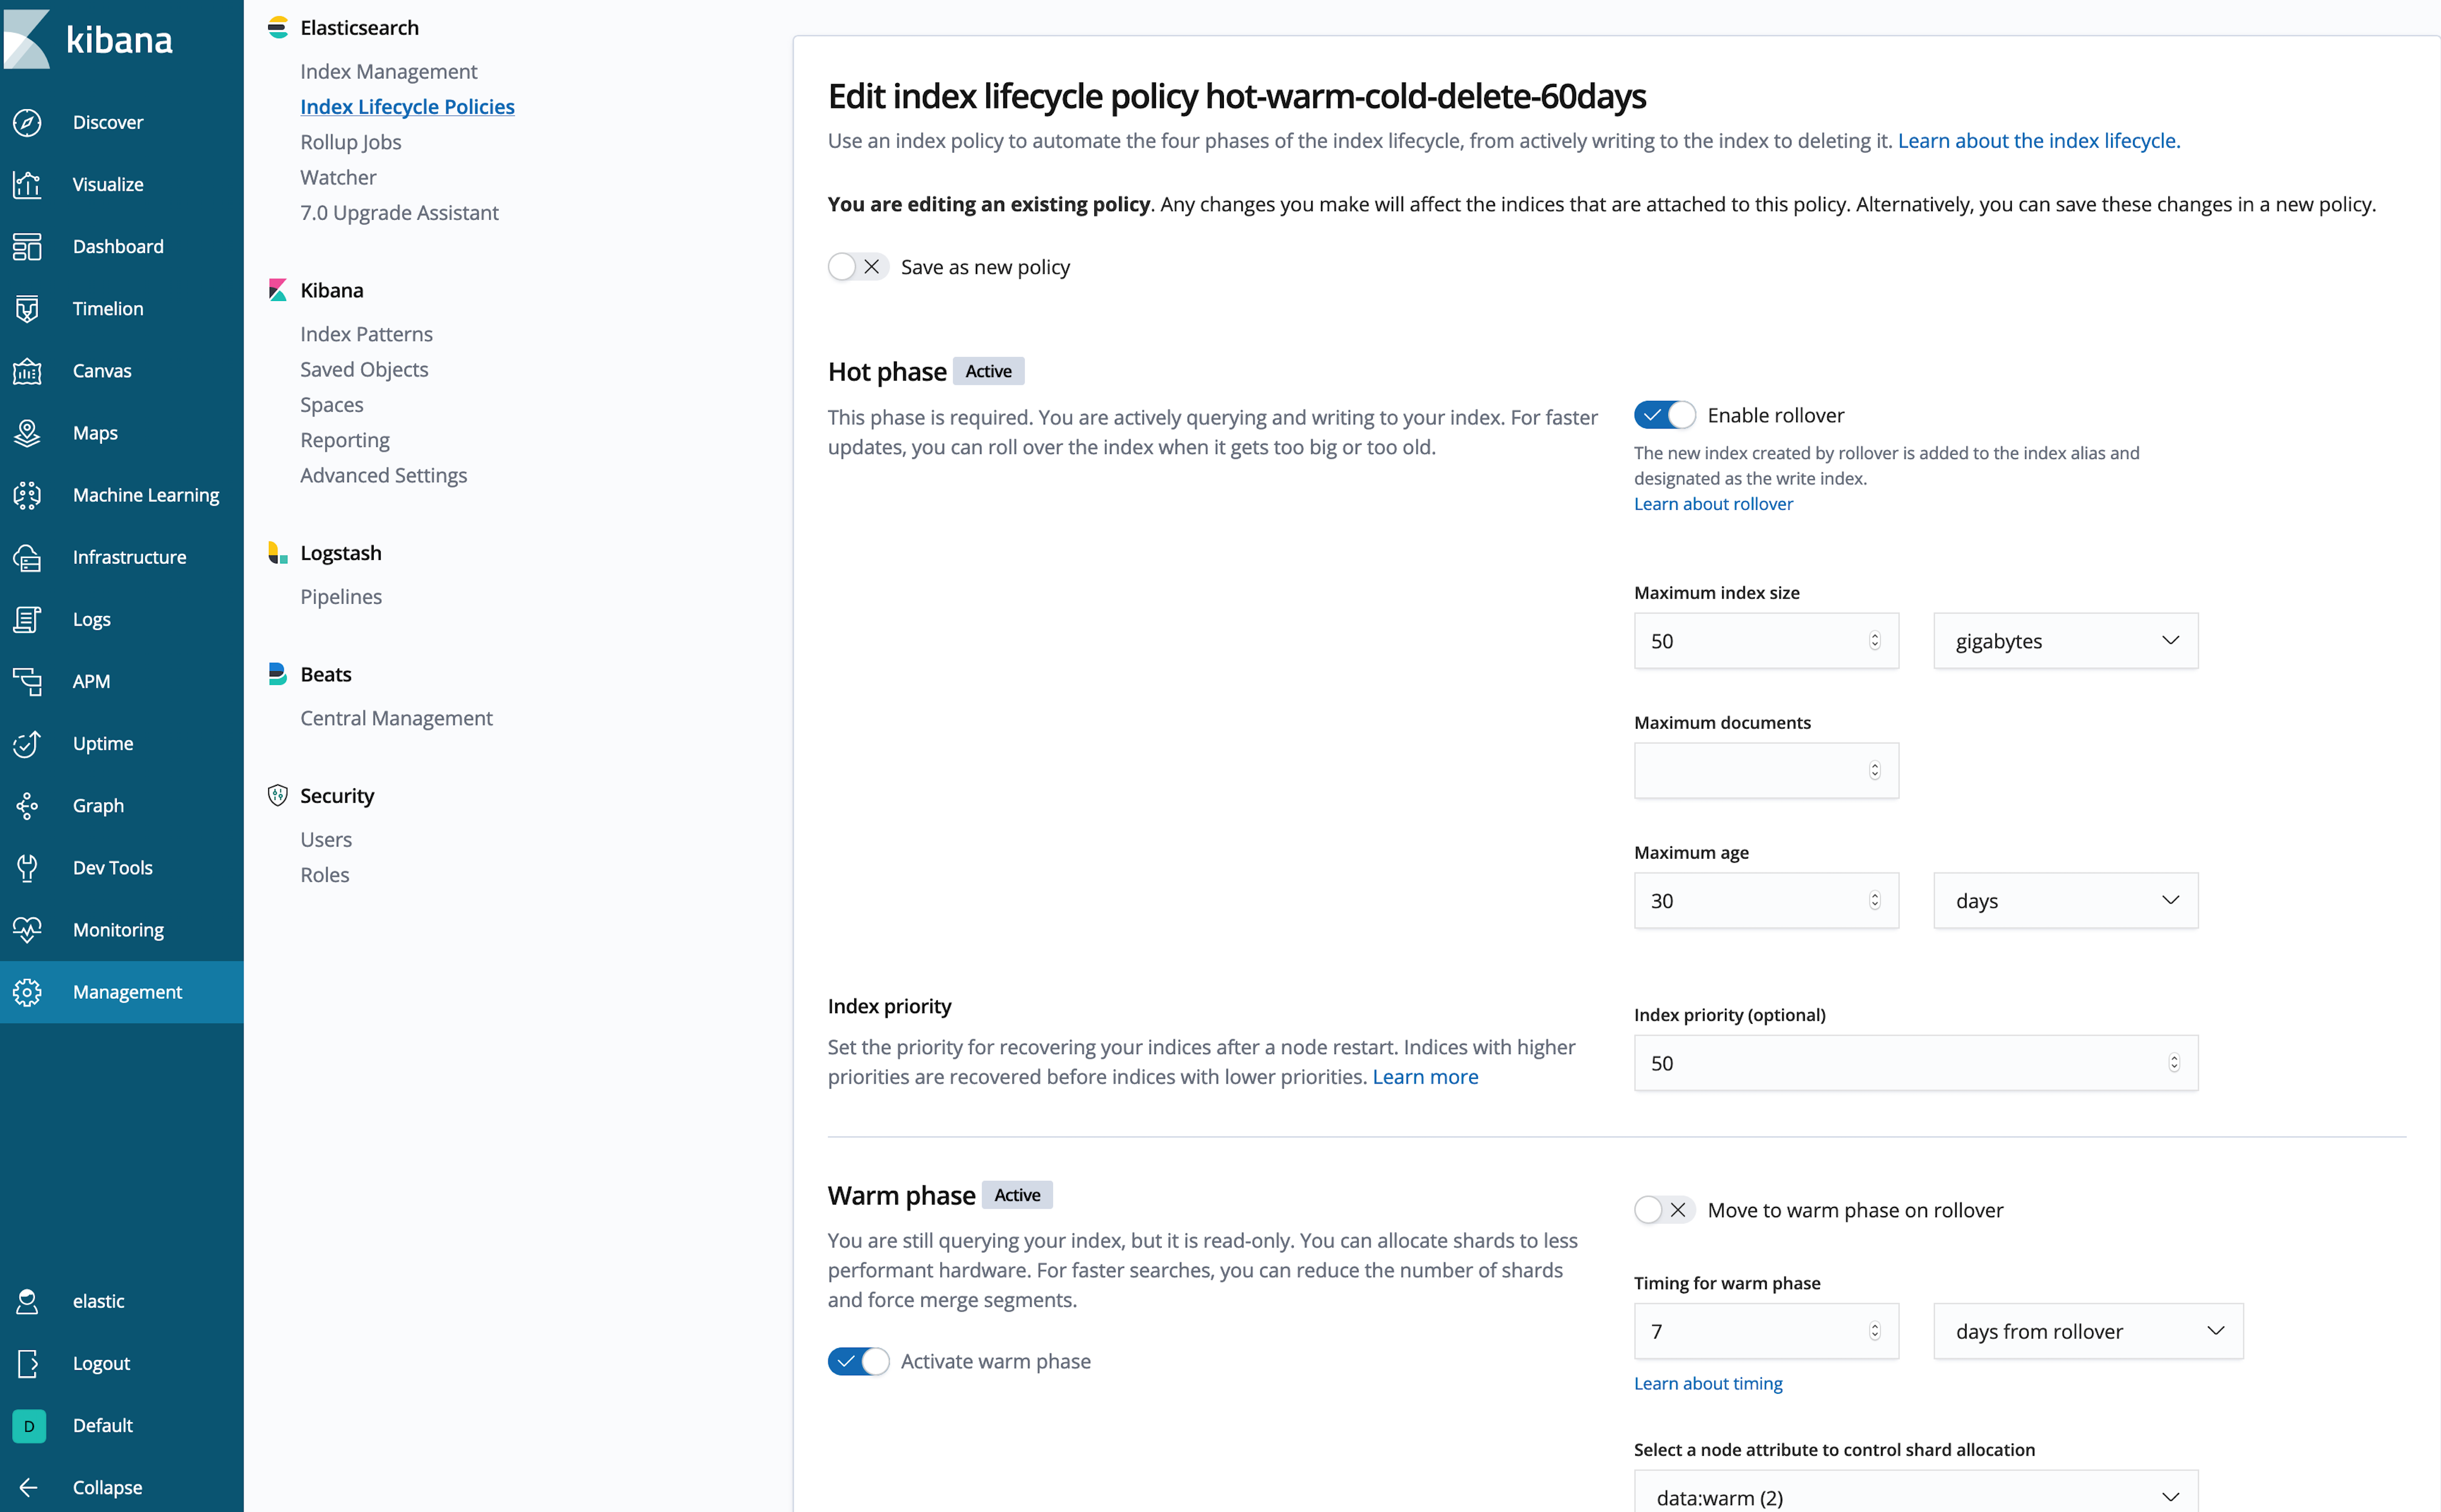
- hot-warm-cold-delete-60days 정책을 Beats 및 Logstash 인덱스에 연결하고 이러한 인덱스가 hot 데이터 노드에 작성되고 있는지 확인
- Beats 및 Logstash는 모두 기본적으로 자체 템플릿을 관리하므로 우리는 여러 템플릿 매칭을 사용하여 ILM 정책을 적용하려는 인덱스 패턴에 대한 정책 및 할당 규칙을 추가
- template은 Beats 및 Logstash 인덱스 패턴과 매칭되므로 어떤 인덱스 패턴을 매칭
- LM을 지원하지 않는 데이터 생산자의 인덱스 패턴을 여기에 추가하는 경우 이 정책의 롤오버 요구 사항을 수동으로 충족해야 함
- Beats 및 Logstash에서 ILM 활성화
- Beats 설정
output.elasticsearch: ilm.enabled: true- Logstash 설정
output { elasticsearch { ilm_enabled => true } }- 인덱스 패턴과 매칭되는 모든 새 인덱스가 hot 노드에 새 인덱스를 생성하고 ILM이 hot-warm-cold-delete-60days 정책을 적용
- ILM 정책 업데이트
- 언제든지 ILM 정책을 업데이트를 할수 있으나, 정책에 대한 변경 사항은 단계가 바뀔 때만 적용
- 예를 들어, 인덱스가 현재 hot 단계에 있고 warm 단계를 기다리는 경우, hot 단계에 대한 변경 사항은 해당 인덱스에 적용되지 않지만 warm 단계에 대한 변경 사항은 해당 단계에 진입할 때 적용
- Command를 통한 정책 설정 외에도 Kibana 를 통해 손쉽게 정책을 설정 할수 있음
- Hot :
- ILM Hot - Warm - Cold ?(https://www.elastic.co/kr/blog/implementing-hot-warm-cold-in-elasticsearch-with-index-lifecycle-management)
8. Elastic Search 보안
(https://www.elastic.co/kr/blog/security-for-elasticsearch-is-now-free)
- Elastic Stack 6.8 , 7.1.0 이후 부터 보안 무료 제공
- 암호화된 통신을 위한 TLS
- 사용자 생성 및 관리를 위한 파일 영역과 네이티브 영역
- 클러스터 API와 인덱스에 대한 사용자 액세스를 제어하기 위한 역할 기반 액세스 제어
- Kibana Space를 위한 보안으로 Kibana 에 대한 멀티테넌시 허용
- 싱글 사인온과 Active Directory/LDAP 인증부터 필드와 문서 수준 보안에 이르기까지 고급 보안 기능은 계속 유료 기능
- 인증서 생성
#bin/elasticsearch-certutil cert -out config/elastic-certificates.p12 -pass "" - Master / Data Node 서버 elasticsearch.yml 아래 추가
xpack.security.enabled: true xpack.security.transport.ssl.enabled: true xpack.security.transport.ssl.verification_mode: certificate xpack.security.transport.ssl.keystore.path: elastic-certificates.p12 xpack.security.transport.ssl.truststore.path: elastic-certificates.p12 - Elastsicsearch password 생성
#bin/elasticsearch-setup-passwords auto-> 패스워드는 임의로 생성 되며 kibana 에서 수동으로 변경 가능
- Kibana 보안
- 위 setup-passwords 명령어로 출력된 password를 아래 kibana.yml 추가
server.ssl.enabled: true
server.ssl.certificate: /etc/kibana/config/certs/my-kibana.crt
server.ssl.key: /etc/kibana/config/certs/my-kibana.key
elasticsearch.username: "user"
elasticsearch.password: "pass"
- 위 setup-passwords 명령어로 출력된 password를 아래 kibana.yml 추가
- Kibana 내에서 역할 기반 액세스 제어(RBAC)
- elastic 계정 / password 입력
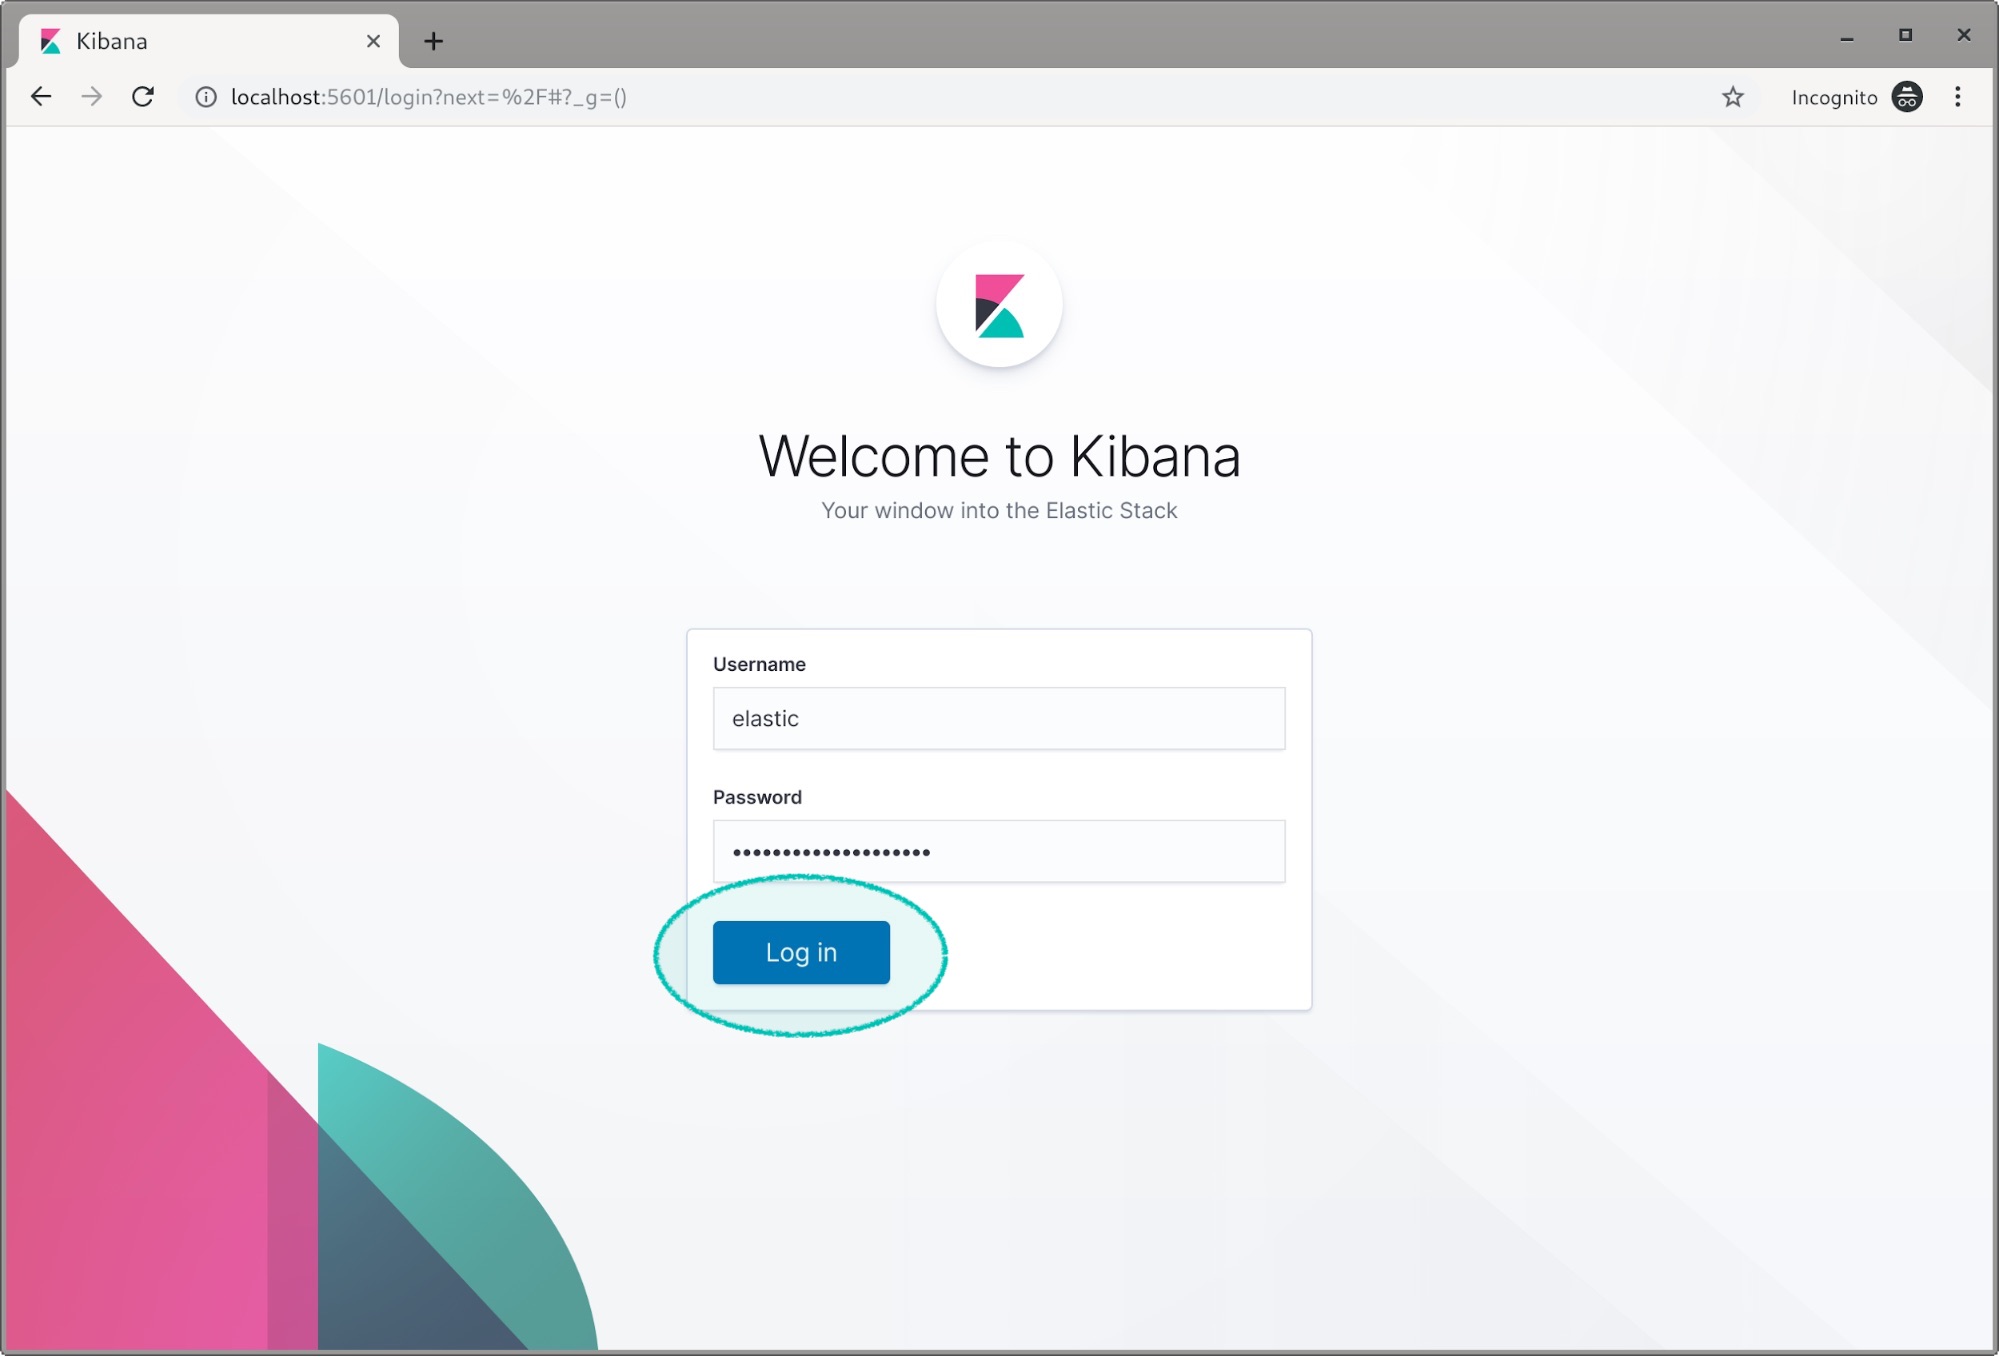
- management Tab 클릭

- Security -> Roles 클릭
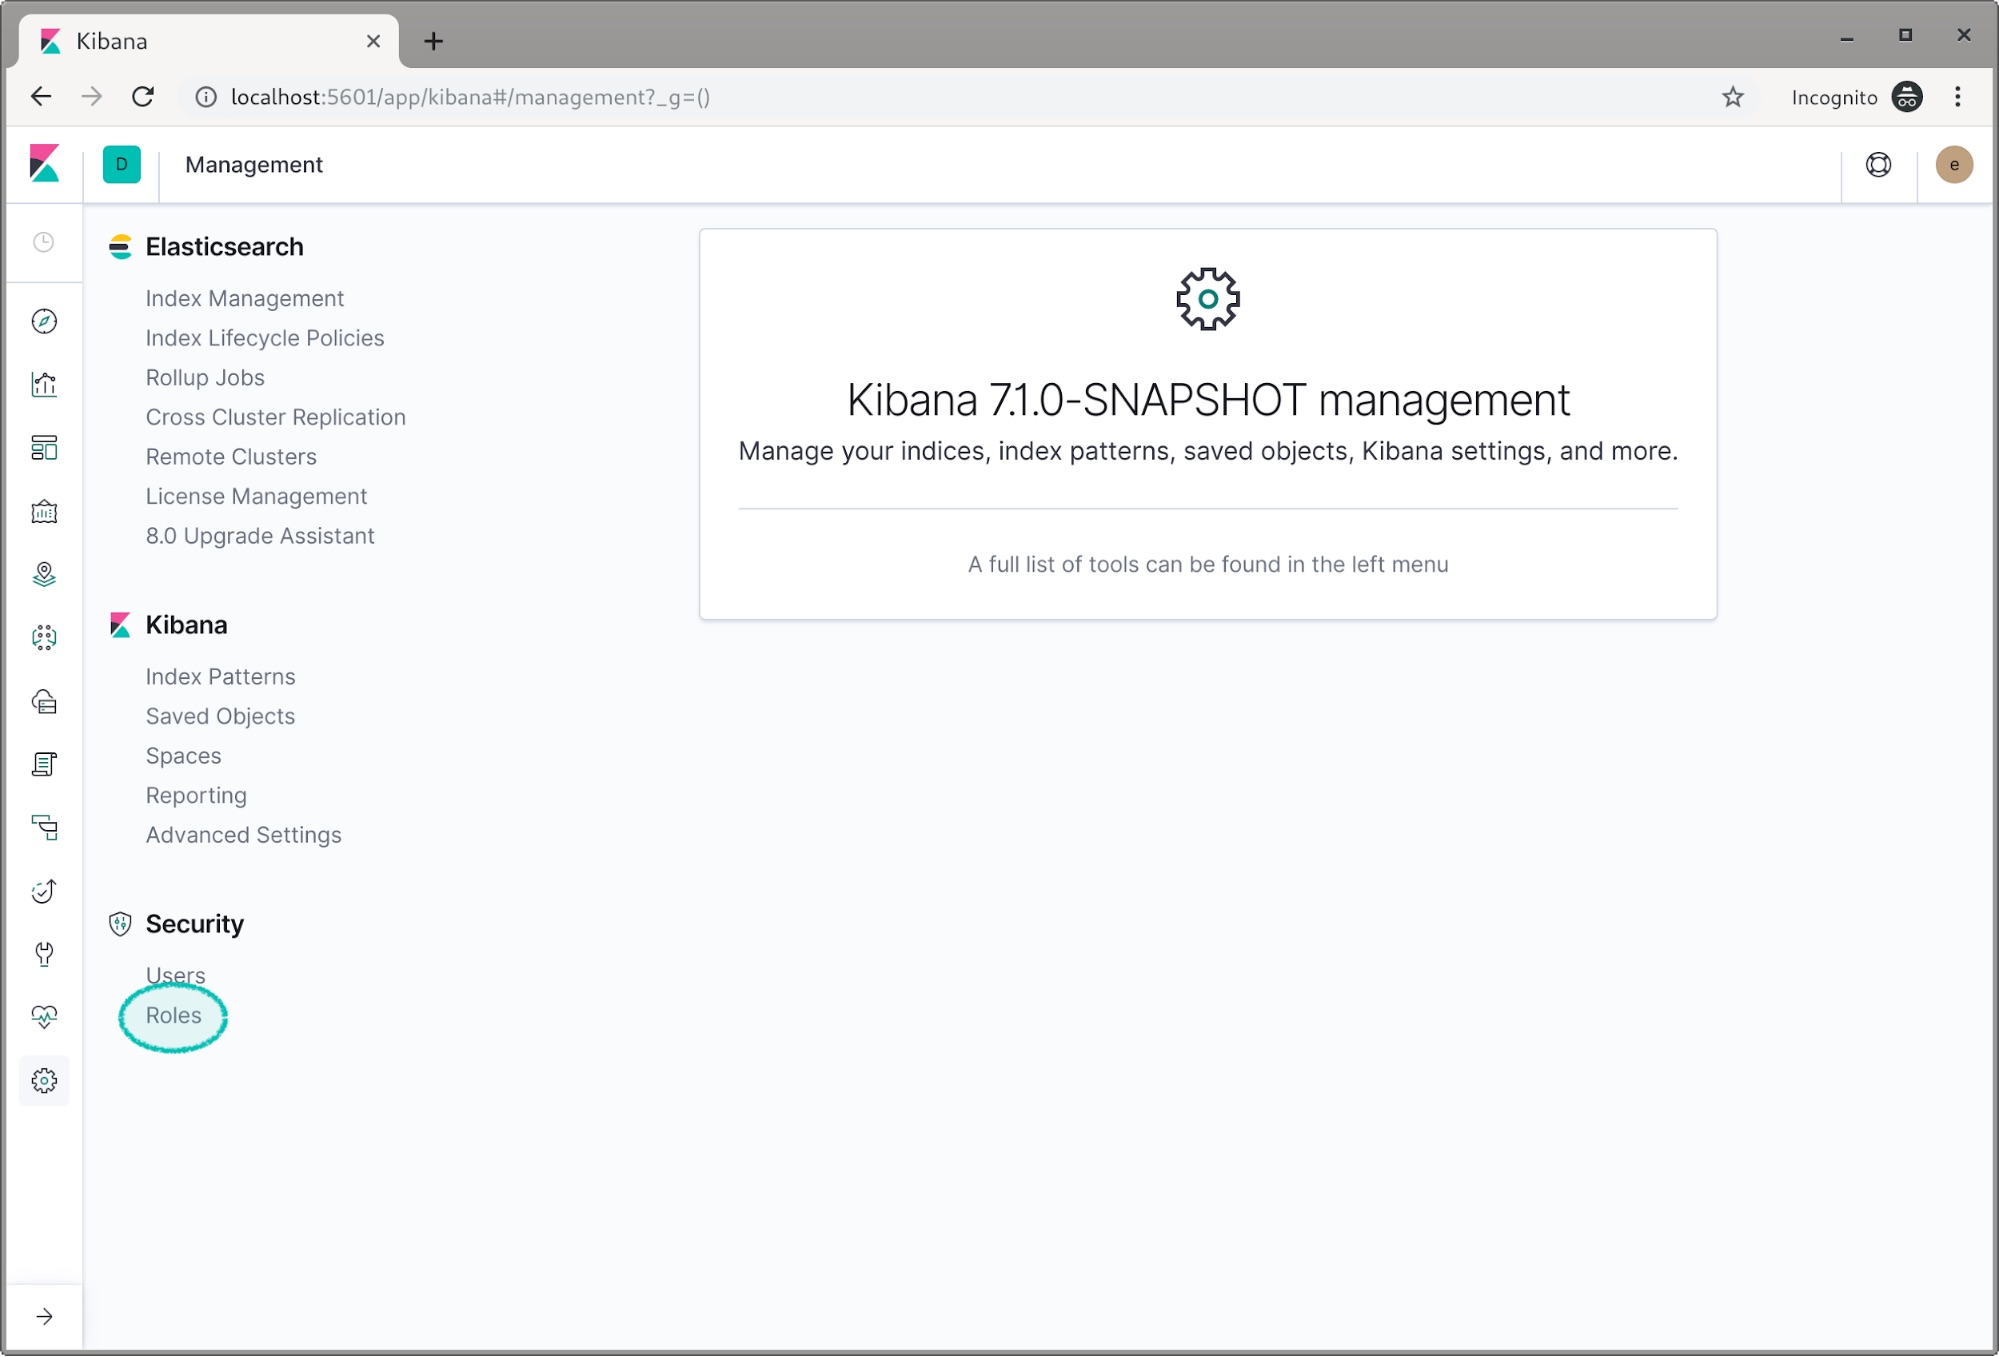
- Create role(역할 만들기)를 클릭
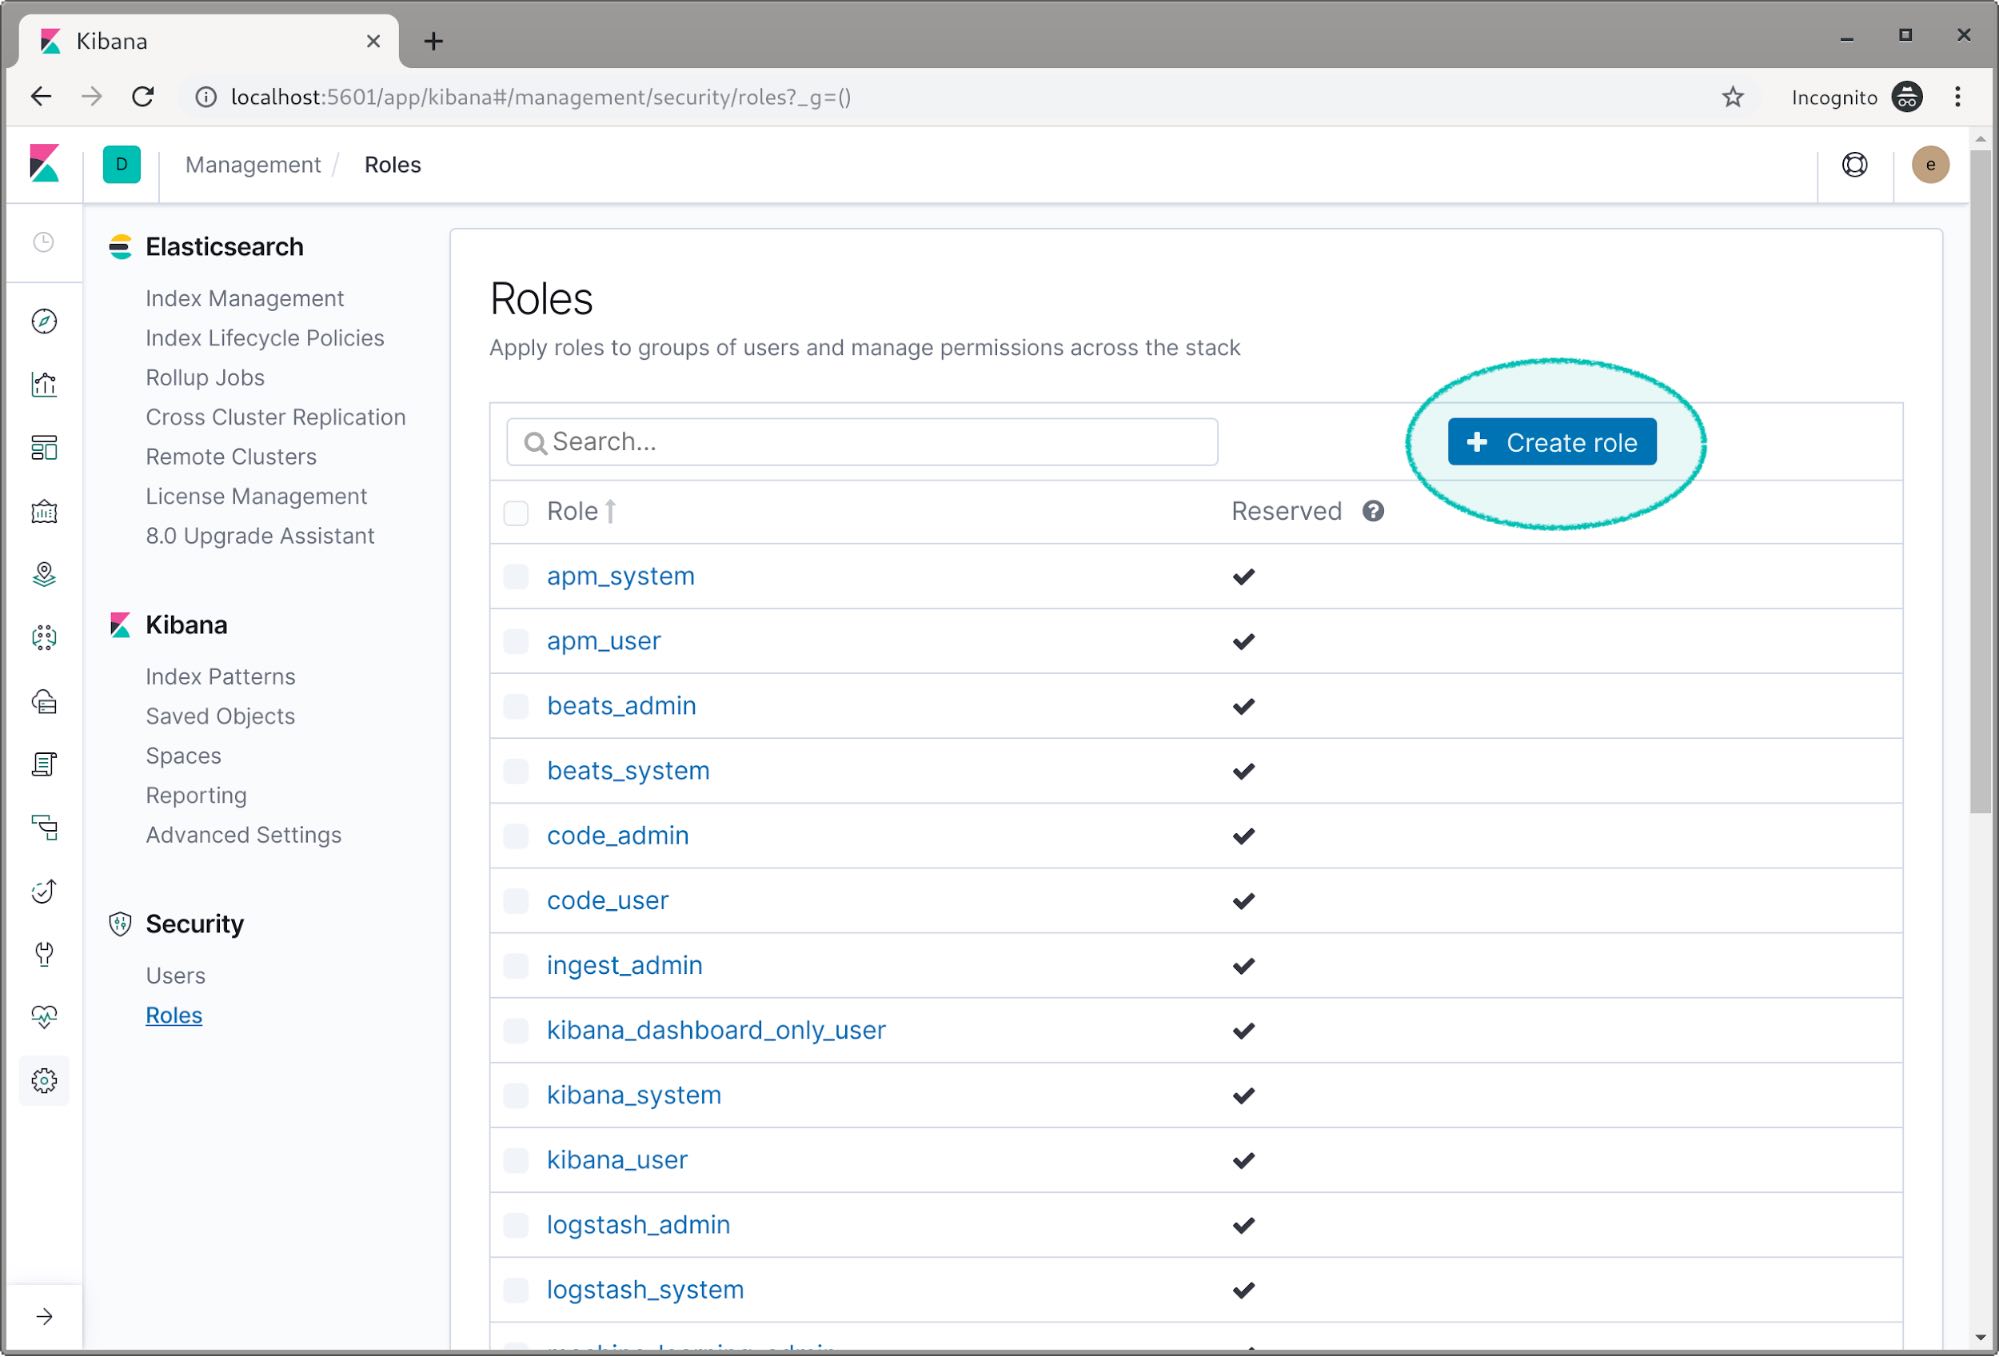
- 첫 번째 역할에 read_logs 인 Role Name 입력
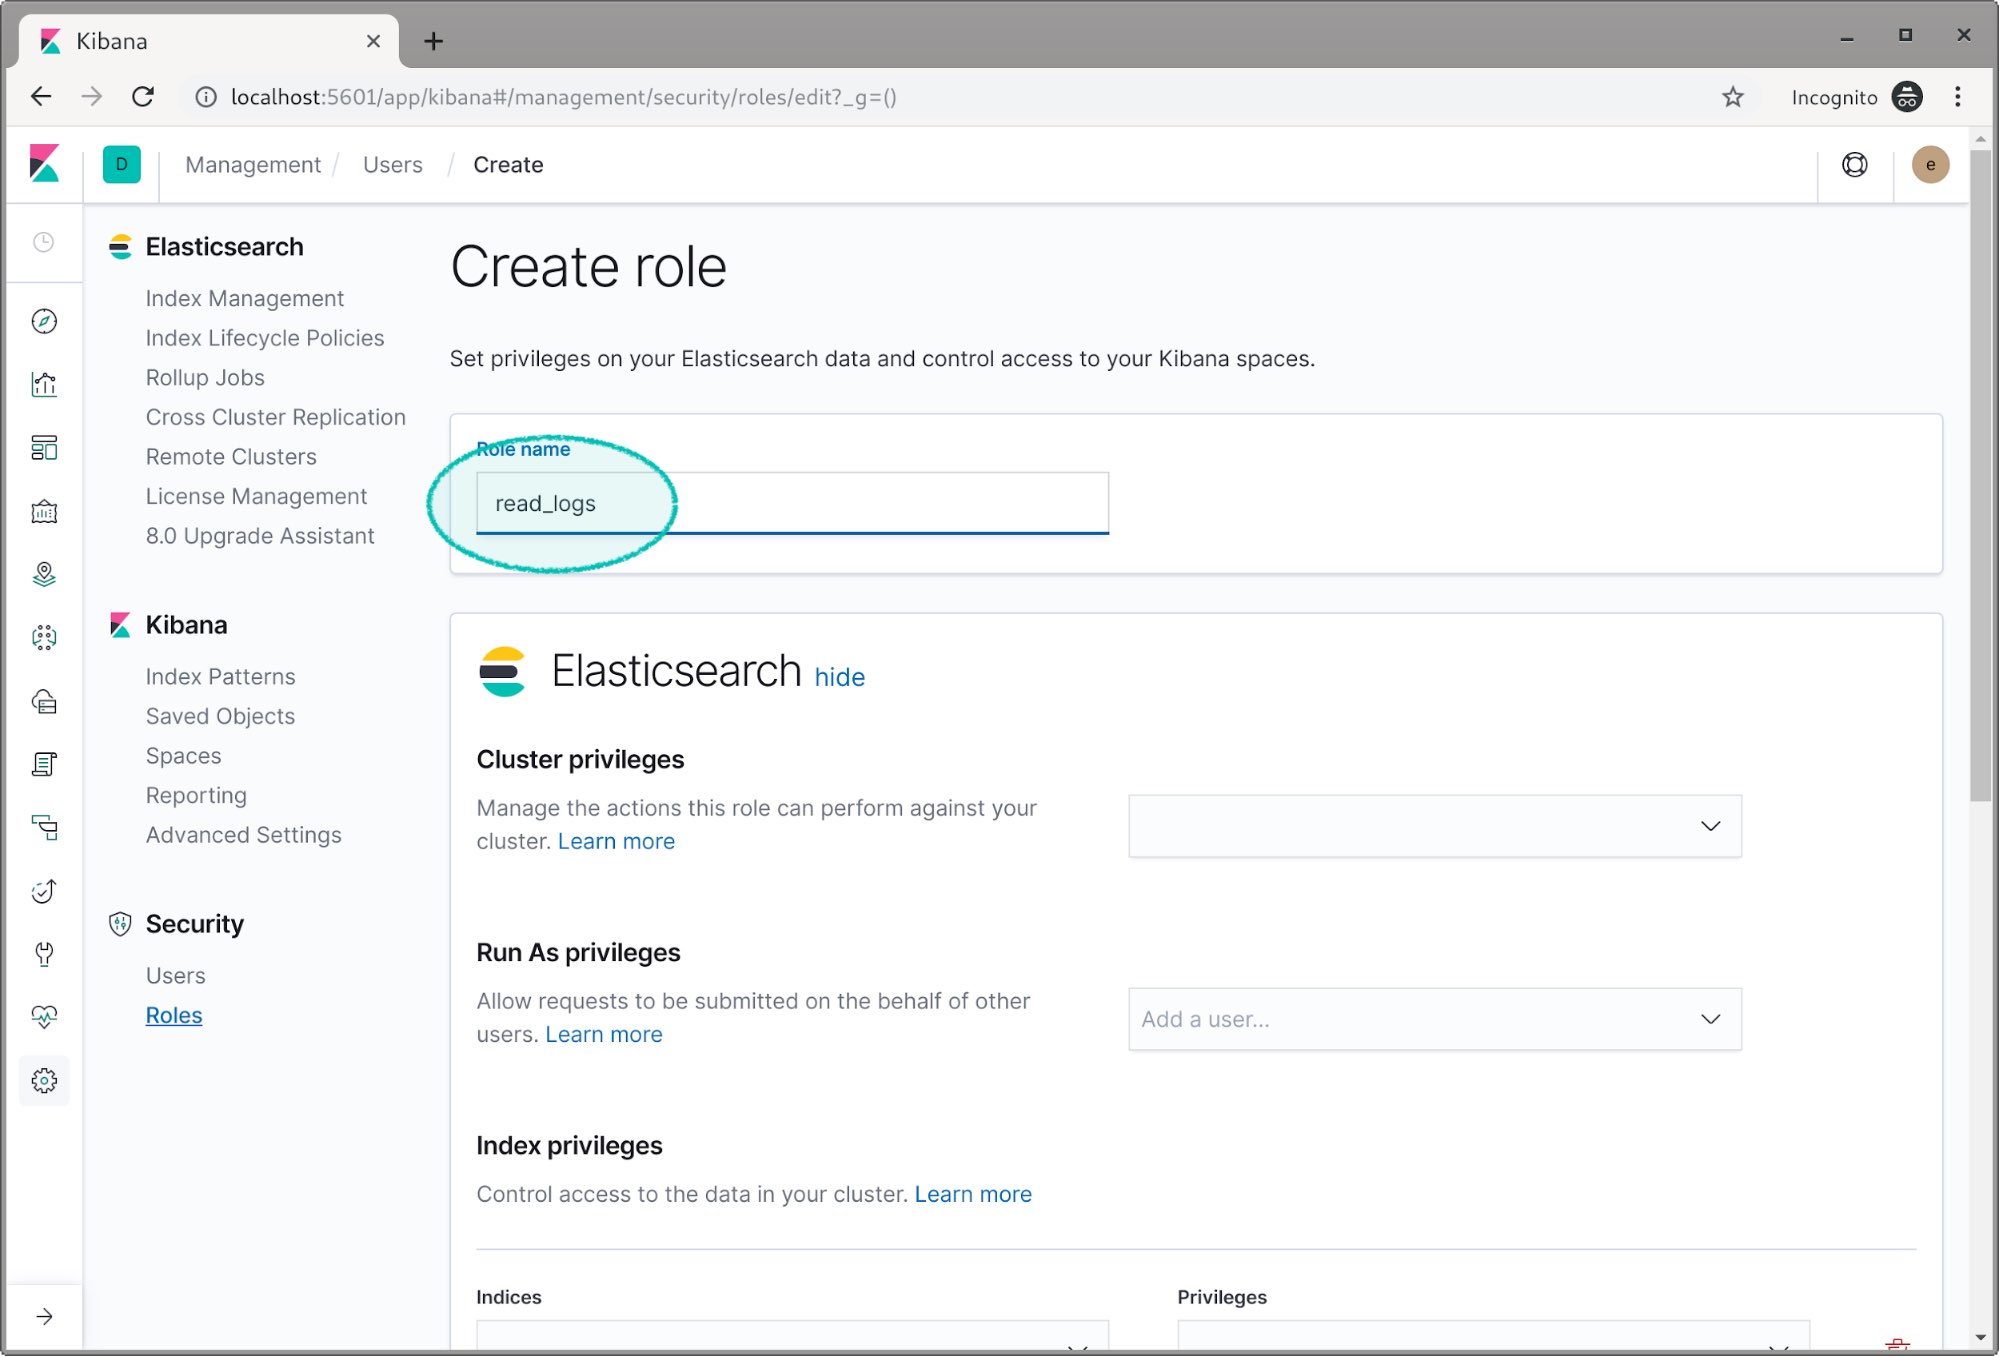
- 권한 부여할 Index 선택 및 Read 권한 부여
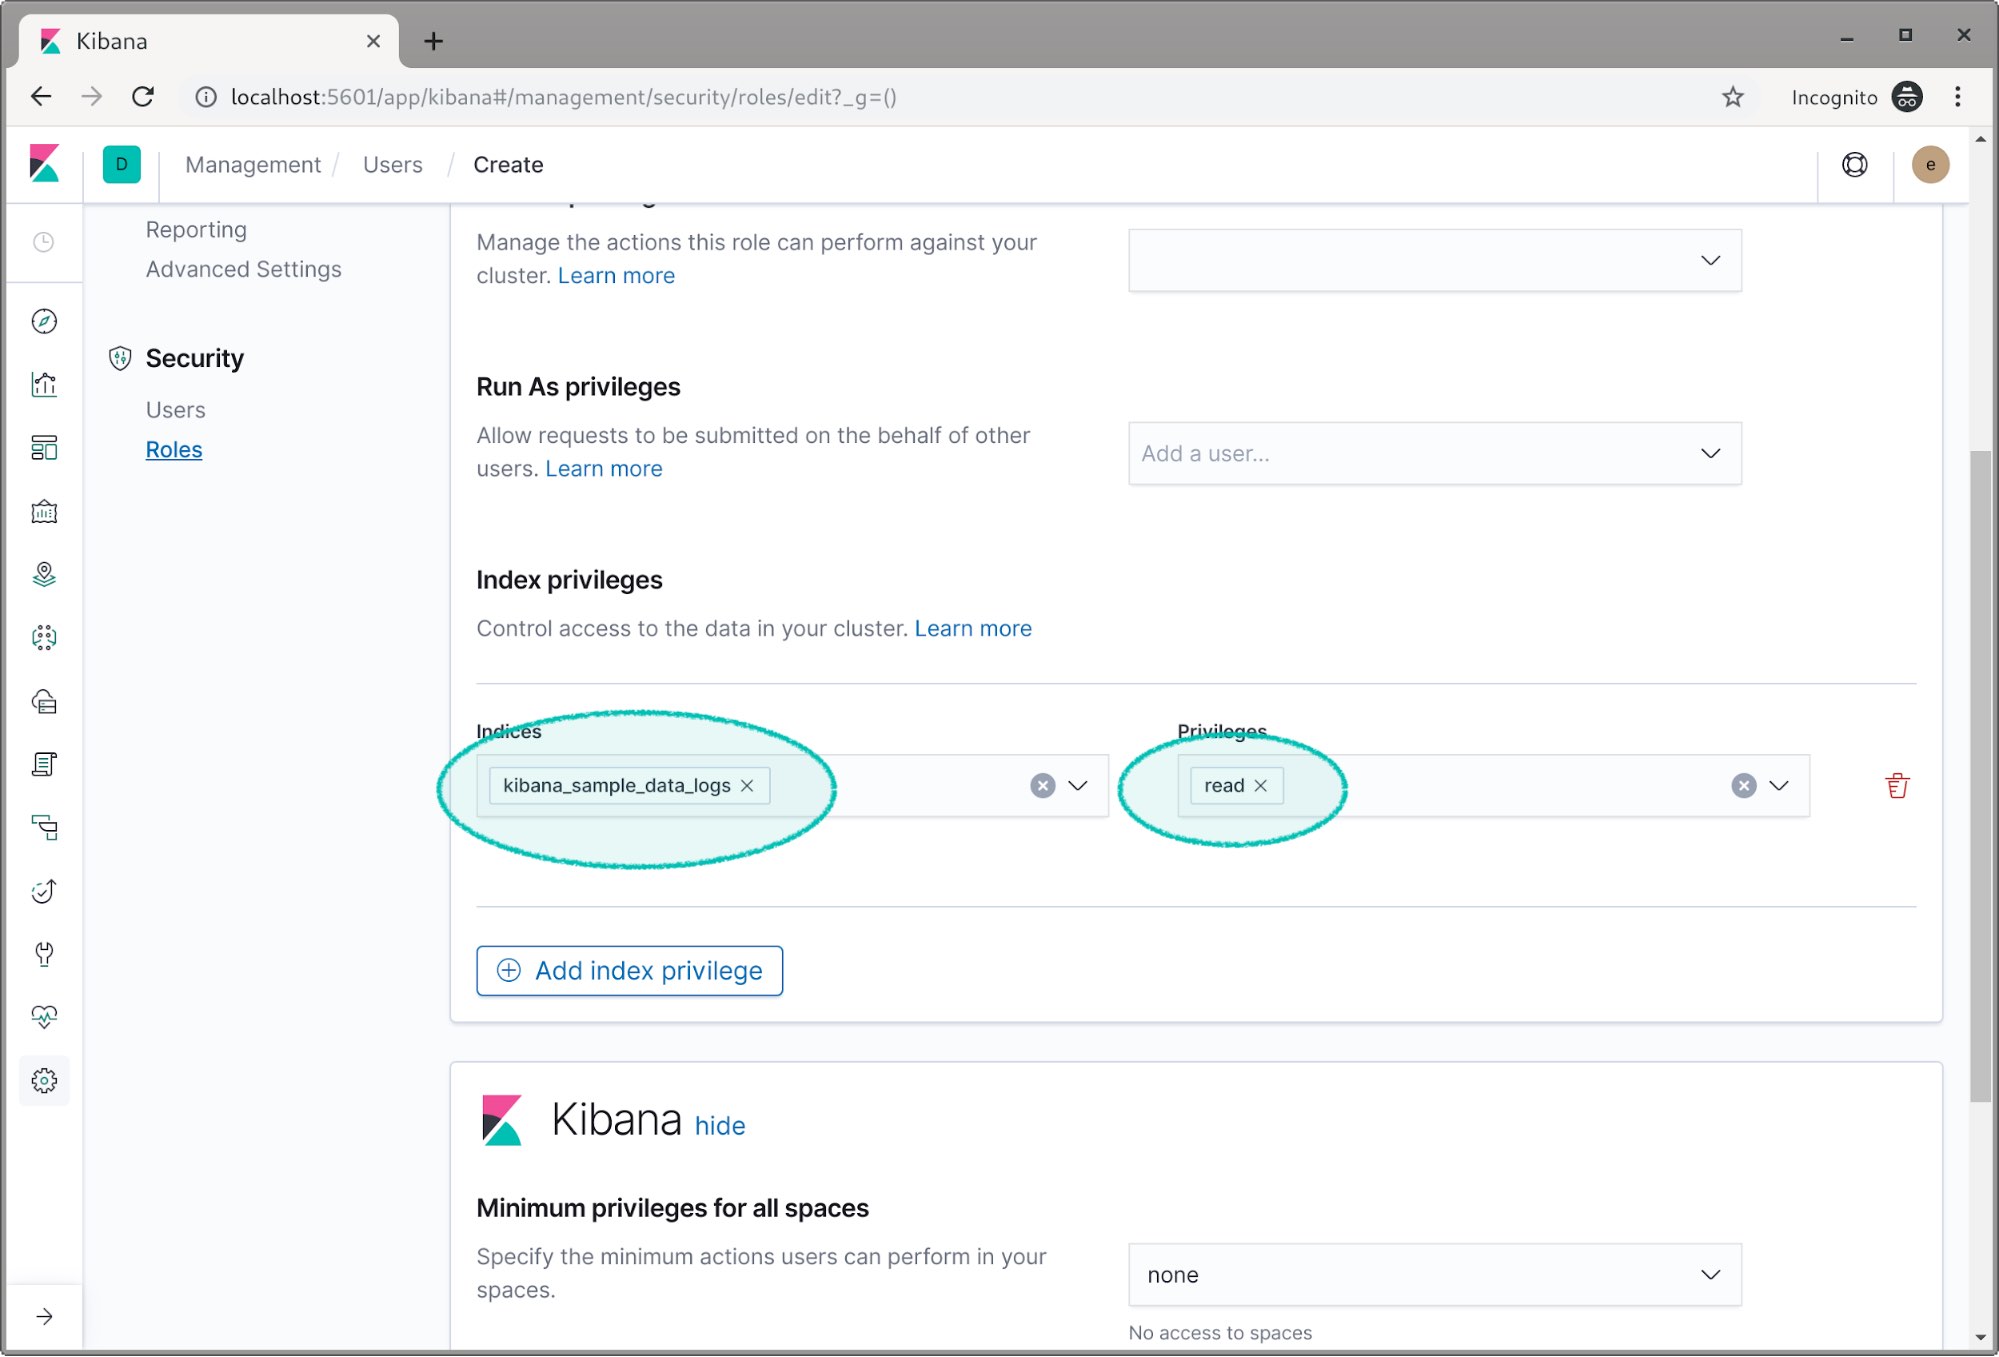
- Security -> Users 클릭 , Create new user (새 사용자 생성) 클릭
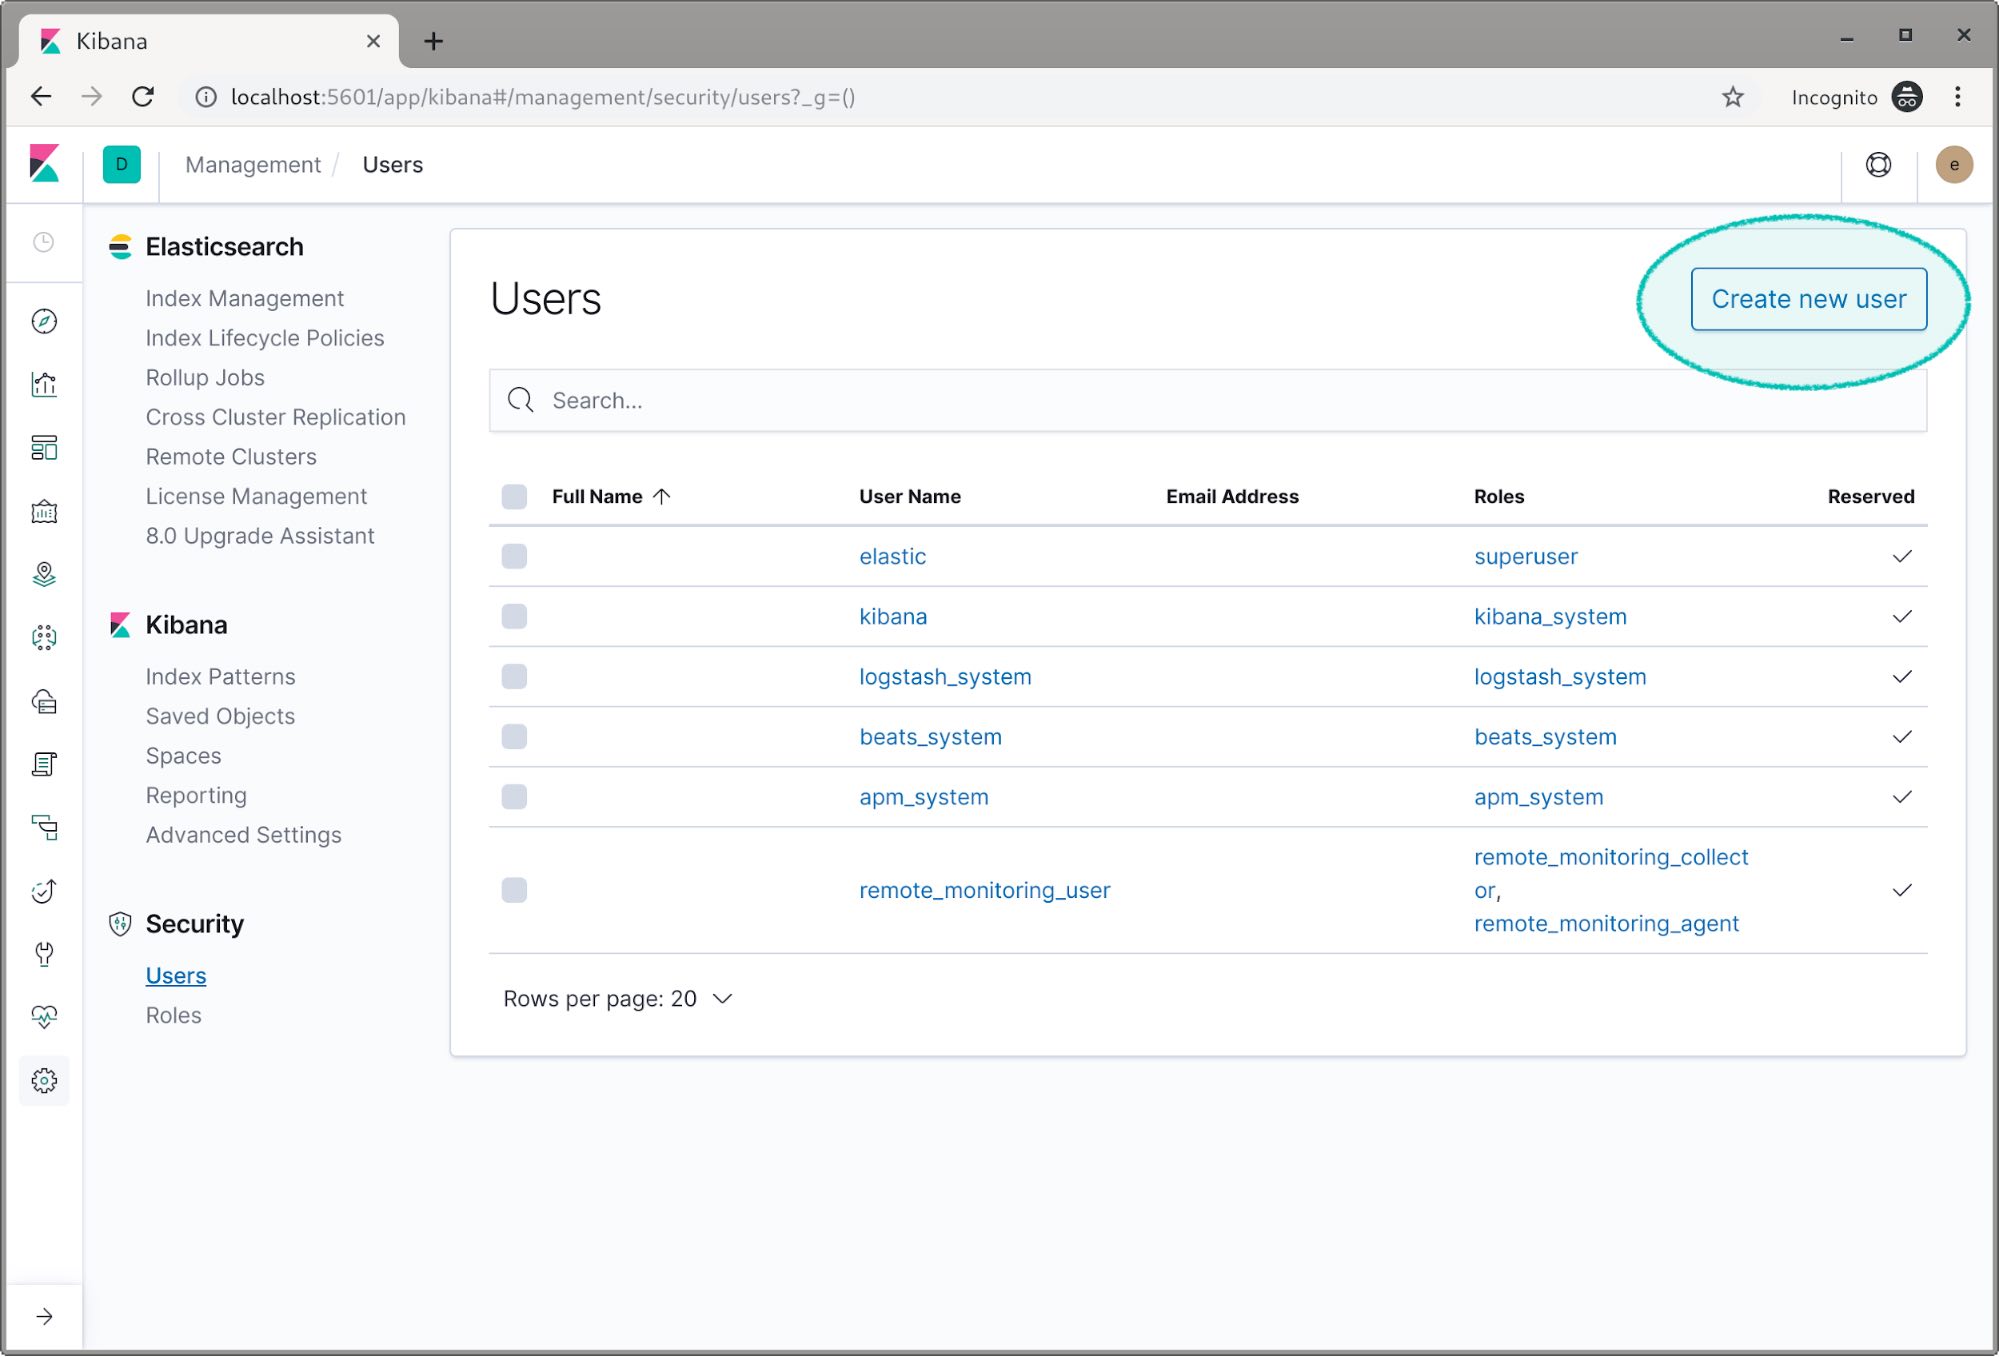
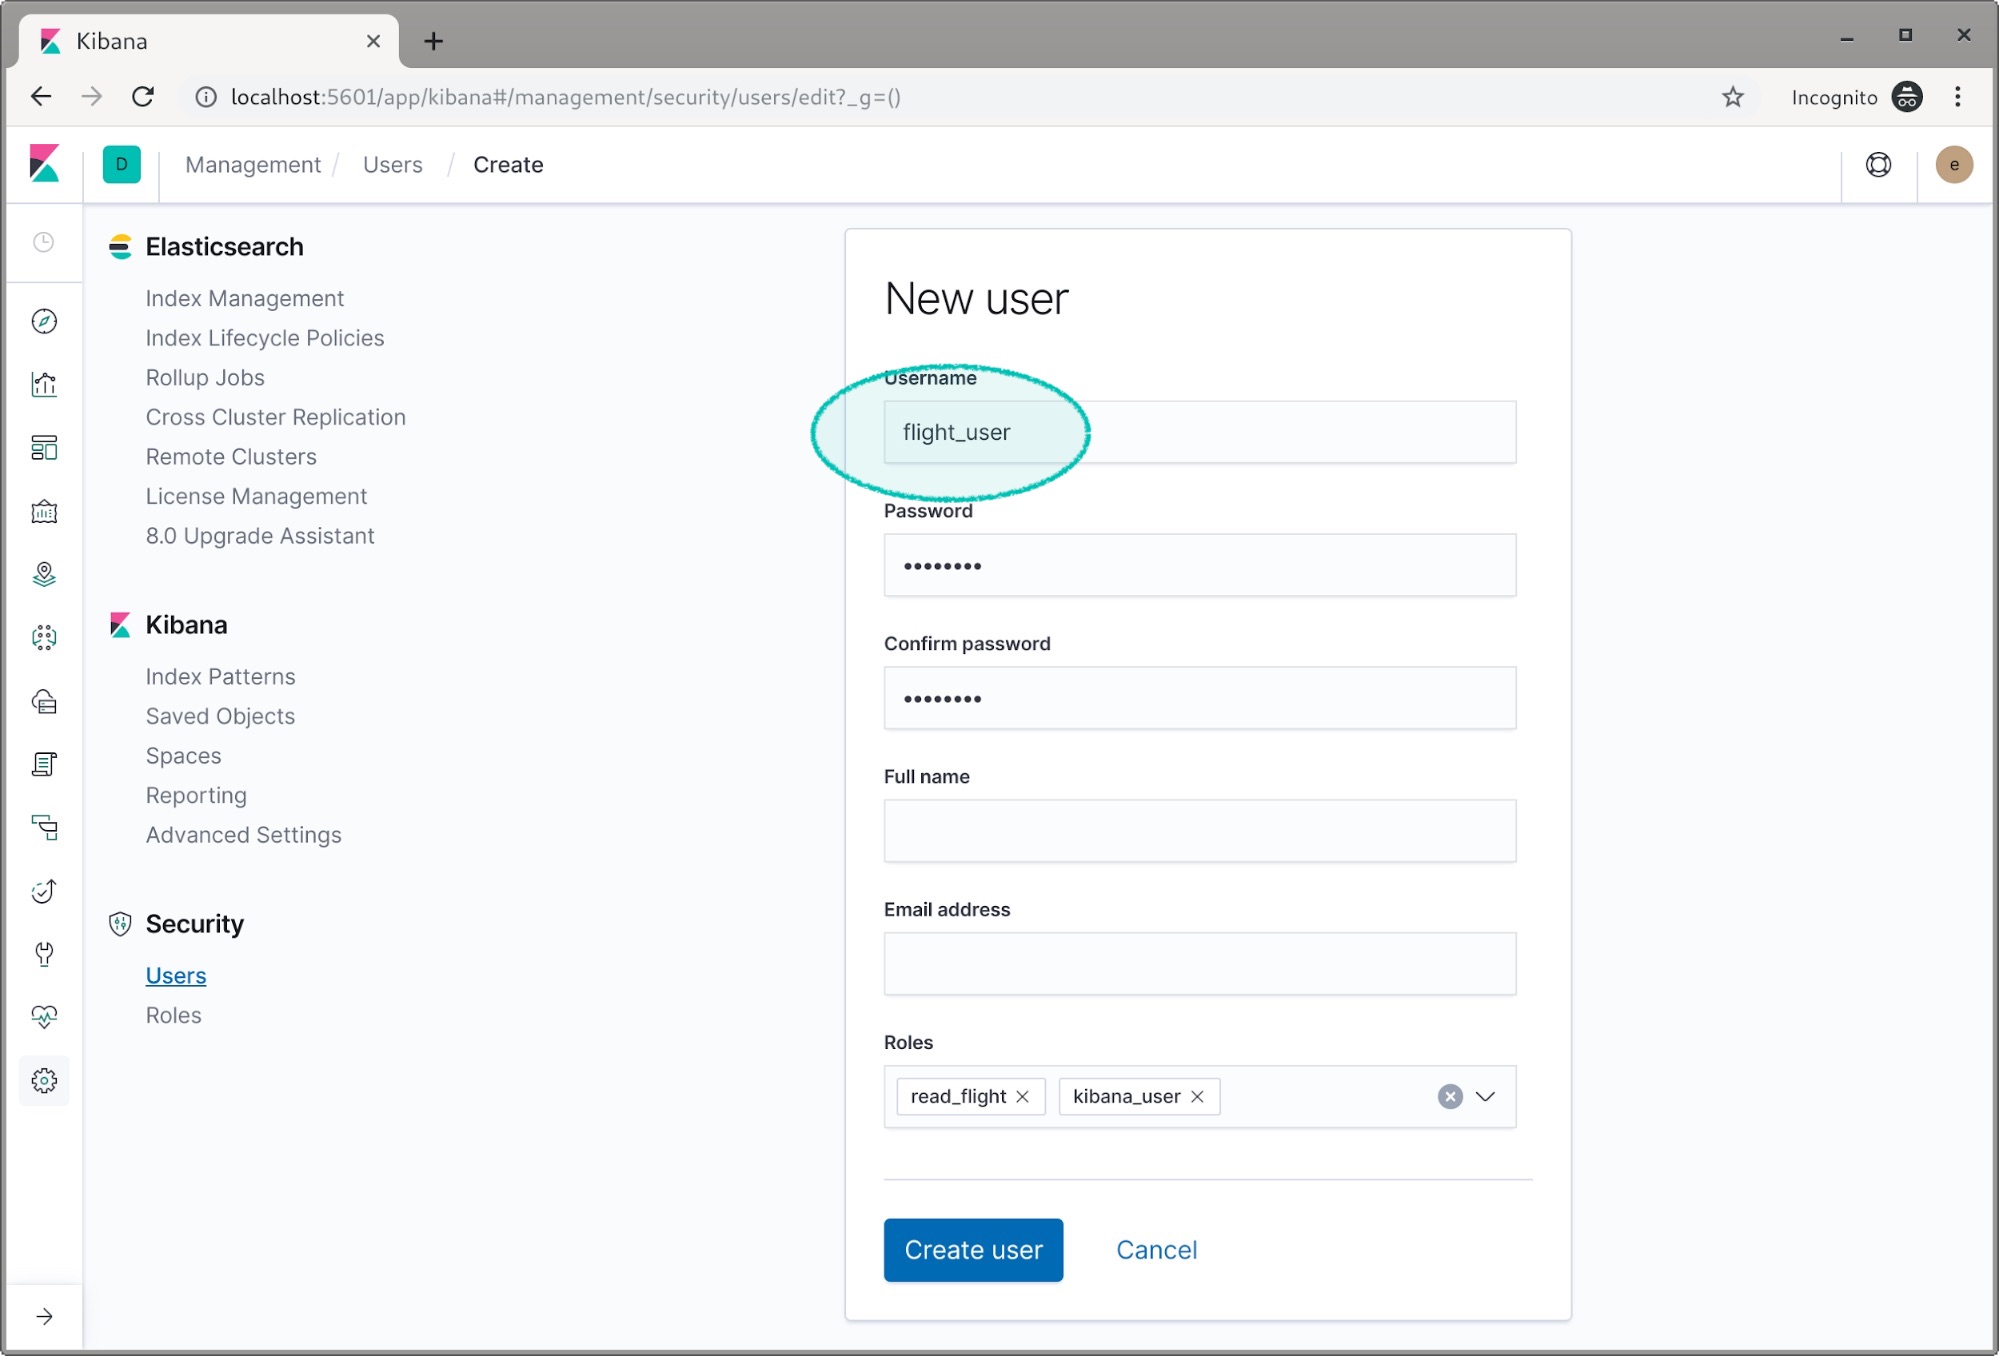
- flight_user 생성 과 read_flight Role 부여
- Kibana에서 데이터 확인을 위해 kibana_user Role 부여
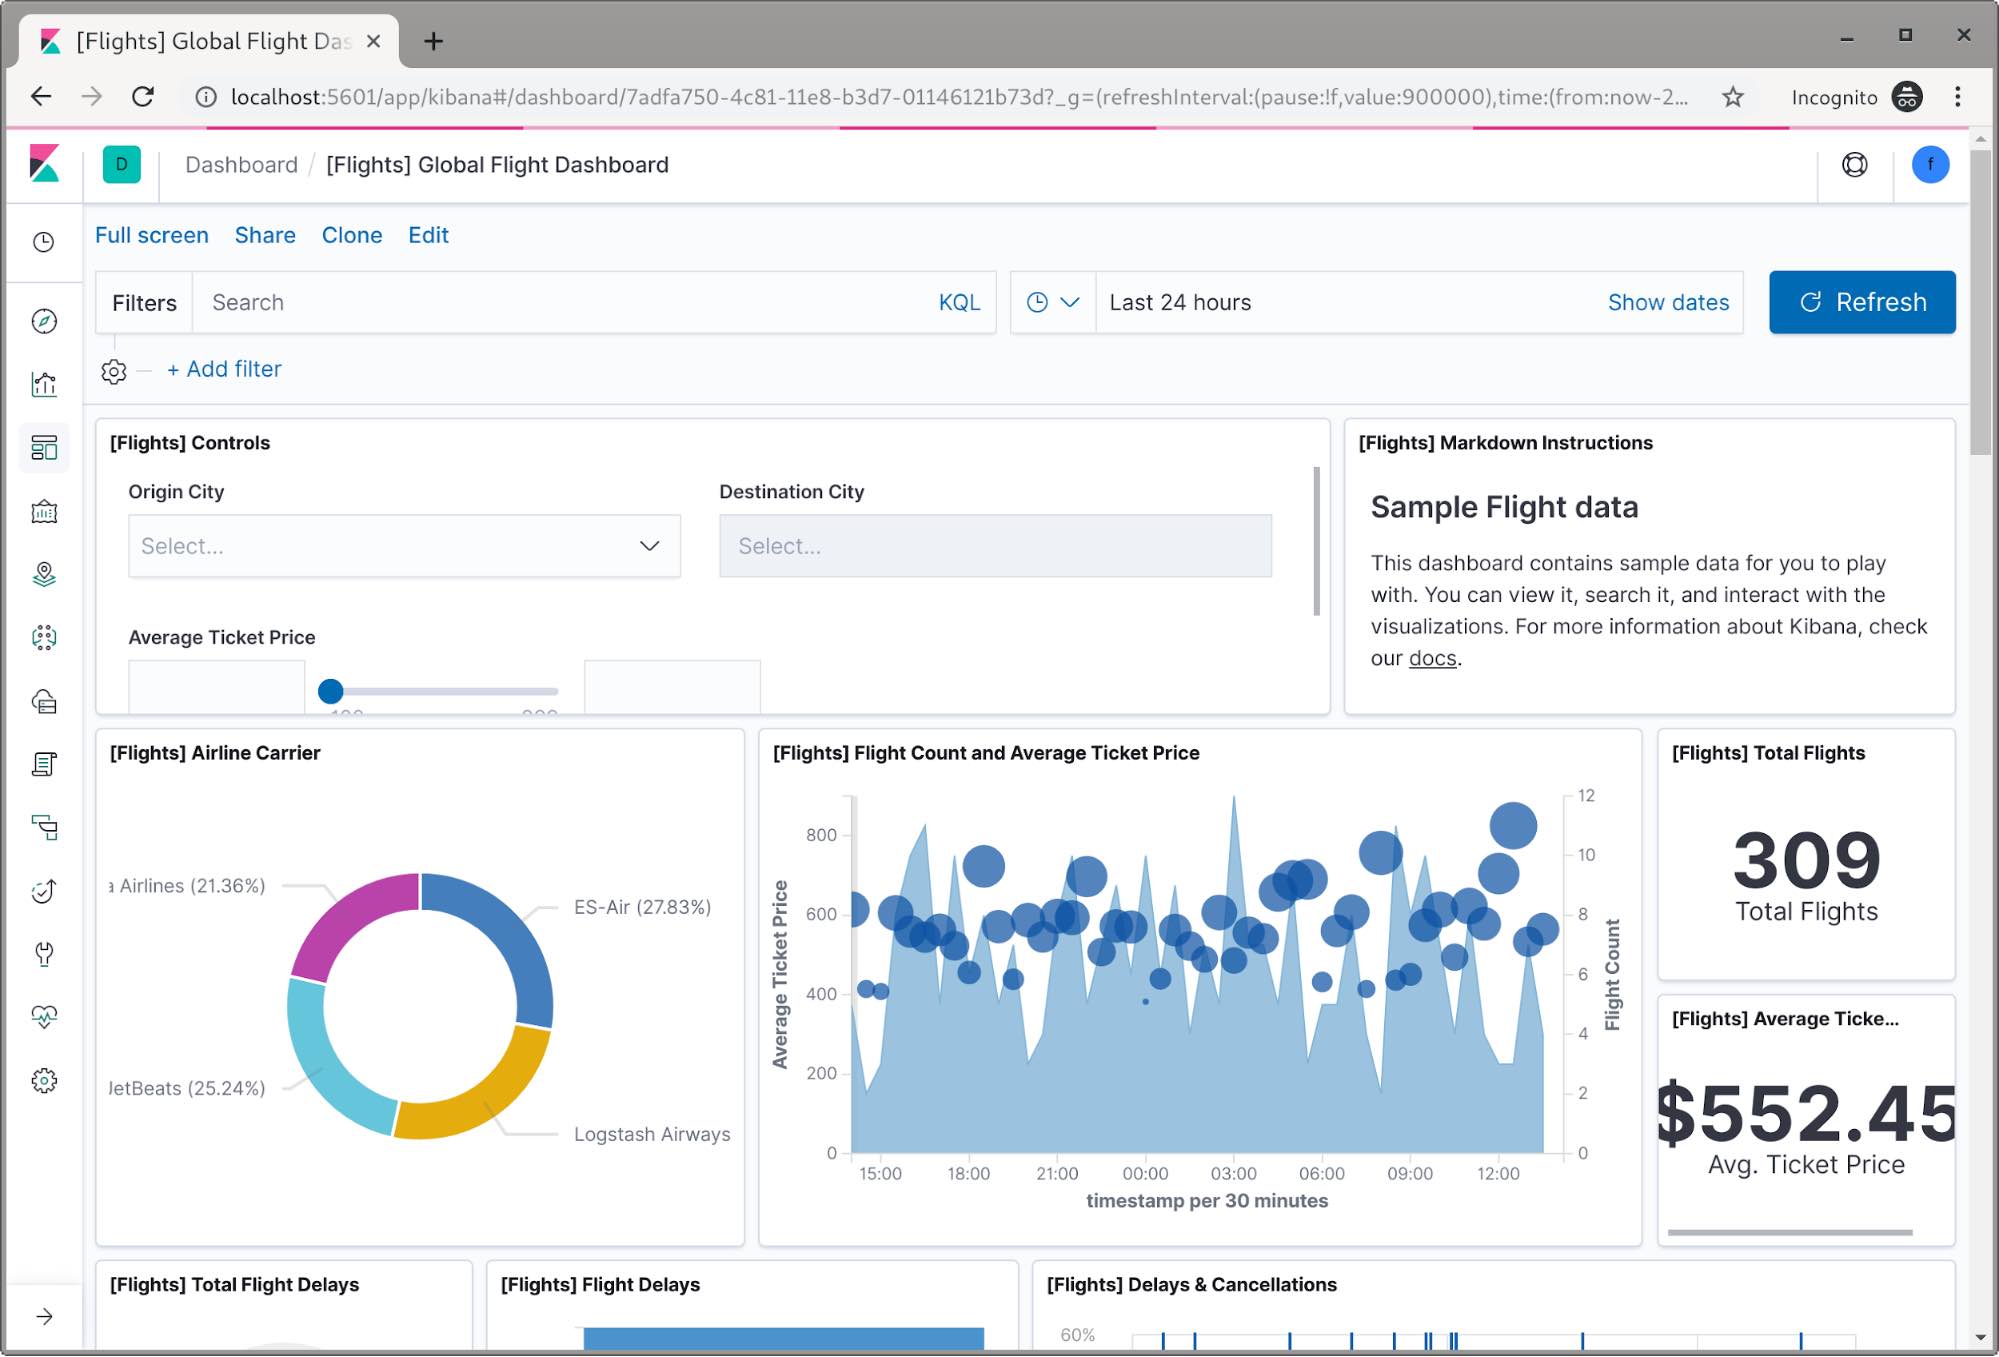
- elastic 계정 Logout 후 flight_user 로 로그인시 DashBoard 확인 가능
- elastic 계정 / password 입력
9. _cat 활용하기
-
allocation : Node 정보
GET /_cat/allocation/<node_name> GET /_cat/allocation shards disk.indices disk.used disk.avail disk.total disk.percent host ip node 194 917gb 2.7tb 51.8tb 54.5tb 4 elastic01 1.1.1.41 elastic01 193 741.5gb 2.1tb 52.3tb 54.5tb 4 elastic03 1.1.1.43 elastic03 193 995.2gb 2.9tb 51.6tb 54.5tb 5 elastic02 1.1.1.42 elastic02 -
shards : 각 Index의 Shard 정보
GET /_cat/shards/<index> GET /_cat/shards index shard prirep state docs store ip node weblog-iis-2019.11.26 3 r STARTED 4594888 2.3gb 1.1.1.41 elastic01 weblog-iis-2019.11.26 3 p STARTED 4594888 2.3gb 1.1.1.43 elastic03 weblog-iis-2019.11.26 4 r STARTED 4595981 2.3gb 1.1.1.42 elastic02 weblog-iis-2019.11.26 4 p STARTED 4595981 2.3gb 1.1.1.43 elastic03 weblog-iis-2019.11.26 1 r STARTED 4593197 2.3gb 1.1.1.41 elastic01 weblog-iis-2019.11.26 1 p STARTED 4593197 2.3gb 1.1.1.43 elastic03 weblog-iis-2019.11.26 2 r STARTED 4591679 2.3gb 1.1.1.42 elastic02 weblog-iis-2019.11.26 2 p STARTED 4591679 2.3gb 1.1.1.43 elastic03 weblog-iis-2019.11.26 0 p STARTED 4596736 2.3gb 1.1.1.41 elastic01 weblog-iis-2019.11.26 0 r STARTED 4596736 2.3gb 1.1.1.42 elastic02 -
master : Master Node 정보
GET /_cat/master id host ip node 8lHyX_fjSAmVvhtz3HY8WQ prod-elastic01 172.27.1.41 prod-elastic01 -
nodes : 각 Node 의 성능 정보
GET _cat/nodes ip heap.percent ram.percent cpu load_1m load_5m load_15m node.role master name 172.27.1.41 32 99 5 2.59 2.68 3.00 dilm * elastic01 172.27.1.31 14 45 0 0.00 0.06 0.10 l - kibana01 172.27.1.43 62 99 9 4.12 5.15 5.34 dilm - elastic03 172.27.1.32 24 59 0 0.01 0.08 0.12 l - kibana02 172.27.1.42 30 99 2 5.64 5.46 4.92 dilm - elastic02 -
tasks : 실행 중인 작업 정보
GET _cat/tasks action task_id parent_task_id type start_time timestamp running_time ip node indices:data/write/bulk 7I6_9sjLQOSOyvvXCKjoyg:227148846 - transport 1575271854423 07:30:54 308.1ms 1.1.1.42 elastic02 indices:data/write/bulk[s] 7I6_9sjLQOSOyvvXCKjoyg:227148850 7I6_9sjLQOSOyvvXCKjoyg:227148846 transport 1575271854424 07:30:54 307.9ms 1.1.1.42 elastic02 indices:data/write/bulk[s] 8lHyX_fjSAmVvhtz3HY8WQ:218694619 7I6_9sjLQOSOyvvXCKjoyg:227148850 transport 1575271854430 07:30:54 306.5ms 1.1.1.41 elastic01 indices:data/write/bulk[s][p] 8lHyX_fjSAmVvhtz3HY8WQ:218694620 8lHyX_fjSAmVvhtz3HY8WQ:218694619 direct 1575271854430 07:30:54 306.4ms 1.1.1.41 elastic01 -
pending_tasks : Pending된 작업 정보
GET pending_tasks insertOrder timeInQueue priority source -
indices : Index 정보
GET _cat/indeces GET _cat/indices/{index} health status index uuid pri rep docs.count docs.deleted store.size pri.store.size green open weblog-2019.12.01 wh-o8EJ_RU-gn-s9Fqt-pg 5 1 10825189 0 19.4gb 9.7gb green open weblog-2019.12.02 2tsxm5opQl2s4tX0cydQpQ 5 1 4814560 0 10.5gb 5.2gb green open weblog-message-2019.11.22 SgQWiRRCSCCk4ETJNW3kXQ 1 1 50878090 0 59.6gb 29.8gb green open weblog-message-2019.11.23 _X-aMZA8Rvi1oXAVKOvtrw 1 1 50187183 0 59gb 29.5gb green open weblog-message-2019.11.20 fotkZswKT9mkjvt3FfiItQ 1 1 52849597 0 62.8gb 31.4gb green open weblog-message-2019.11.21 28KEVPnlSEmrGLKQkjW2pA 1 1 51782045 0 61.8gb 30.9gb -
segments : segments 정보
GET _cat/segments GET _cat/segments/{index} index shard prirep ip segment generation docs.count docs.deleted size size.memory committed searchable version compound weblog-2019.12.01 0 r 172.27.1.41 _3avi 154062 7 0 29.2kb 20310 true true 8.2.0 true weblog-2019.12.01 0 p 172.27.1.43 _nxj 31015 219698 0 194.9mb 110597 true true 8.2.0 false weblog-2019.12.01 0 p 172.27.1.43 _1dxx 64725 465716 0 422.3mb 215129 true true 8.2.0 false -
count : Docdument 정보
GET _cat/count GET _cat/count/{index} epoch timestamp count 1575272801 07:46:41 3432539983 -
recovery : 복구 관련 정보
GET _cat/recovery GET _cat/recovery/{index} index shard time type stage source_host source_node target_host target_node repository snapshot files files_recovered files_percent files_total bytes bytes_recovered bytes_percent bytes_total translog_ops translog_ops_recovered translog_ops_percent weblog-2019.12.01 0 1.6s peer done elastic03 elastic03 elastic01 elastic01 n/a n/a 1 1 100.0% 1 230 230 100.0% 230 27 27 -
health : Cluster 정보
GET _cat/health epoch timestamp cluster status node.total node.data shards pri relo init unassign pending_tasks max_task_wait_time active_shards_percent 1575273657 08:00:57 log-total green 5 3 770 385 0 0 0 0 - 100.0% -
aliases : aliases Index 정보
GET _cat/aliases GET _cat/aliases/{alias} alias index filter routing.index routing.search is_write_index .kibana_task_manager .kibana_task_manager_2 - - - - .kibana .kibana_3 - - - - -
thread_pool : 각 Node 의 Thread Pool 사용 통계 정보
GET _cat/thread_pool GET _cat/thread_pool/{thread_pools} node_name name active queue rejected elastic01 analyze 0 0 0 elastic01 ccr 0 0 0 elastic01 data_frame_indexing 0 0 0 elastic01 fetch_shard_started 0 0 0 elastic01 fetch_shard_store 0 0 0 elastic01 flush 0 0 0 elastic01 force_merge 0 0 0 elastic01 generic 0 0 0 elastic01 get 0 0 0 elastic01 listener 0 0 0 elastic01 management 1 0 0 elastic01 ml_datafeed 0 0 0 elastic01 ml_job_comms 0 0 0 elastic01 ml_utility 0 0 0 elastic01 refresh 0 0 0 elastic01 rollup_indexing 0 0 0 elastic01 search 0 0 0 elastic01 search_throttled 0 0 0 elastic01 security-token-key 0 0 0 elastic01 snapshot 0 0 0 elastic01 warmer 0 0 0 elastic01 watcher 0 0 0 elastic01 write 7 0 76 -
plugins : Plugins 정보
GET _cat/plugins name component version -
fielddata : fielddata에서 사용된 Heap Memory 양
GET _cat/fielddata GET _cat/fielddata/{fields} id host ip node field size 8lHyX_fjSAmVvhtz3HY8WQ elastic01 1.1.1.41 elastic01 kibana_stats.kibana.uuid 0b 8lHyX_fjSAmVvhtz3HY8WQ elastic01 1.1.1.41 elastic01 domain.keyword 98.6kb 8lHyX_fjSAmVvhtz3HY8WQ elastic01 1.1.1.41 elastic01 type 2.1kb 8lHyX_fjSAmVvhtz3HY8WQ elastic01 1.1.1.41 elastic01 facility.keyword 28.7kb 8lHyX_fjSAmVvhtz3HY8WQ elastic01 1.1.1.41 elastic01 shard.index 0b 8lHyX_fjSAmVvhtz3HY8WQ elastic01 1.1.1.41 elastic01 programname.keyword 47.1kb 8lHyX_fjSAmVvhtz3HY8WQ elastic01 1.1.1.41 elastic01 source_node.name 0b 8lHyX_fjSAmVvhtz3HY8WQ elastic01 1.1.1.41 elastic01 geoip.country_name.keyword 113.1kb 8lHyX_fjSAmVvhtz3HY8WQ elastic01 1.1.1.41 elastic01 sysloghost.keyword 127.9kb 8lHyX_fjSAmVvhtz3HY8WQ elastic01 1.1.1.41 elastic01 referer.keyword 43.1mb 8lHyX_fjSAmVvhtz3HY8WQ elastic01 1.1.1.41 elastic01 page.keyword 224.1mb 8lHyX_fjSAmVvhtz3HY8WQ elastic01 1.1.1.41 elastic01 log.level 20.3kb 8lHyX_fjSAmVvhtz3HY8WQ elastic01 1.1.1.41 elastic01 fields.ServiceDomain.keyword 18.8kb 8lHyX_fjSAmVvhtz3HY8WQ elastic01 1.1.1.41 elastic01 shard.state 0b 8lHyX_fjSAmVvhtz3HY8WQ elastic01 1.1.1.41 elastic01 clienthost.keyword 38.9mb 8lHyX_fjSAmVvhtz3HY8WQ elastic01 1.1.1.41 elastic01 kibana_stats.kibana.status 0b 8lHyX_fjSAmVvhtz3HY8WQ elastic01 1.1.1.41 elastic01 site.keyword 67.6kb 8lHyX_fjSAmVvhtz3HY8WQ elastic01 1.1.1.41 elastic01 event.dataset 45.9kb 8lHyX_fjSAmVvhtz3HY8WQ elastic01 1.1.1.41 elastic01 source_node.uuid 0b 8lHyX_fjSAmVvhtz3HY8WQ elastic01 1.1.1.41 elastic01 severity.keyword 23.2kb 8lHyX_fjSAmVvhtz3HY8WQ elastic01 1.1.1.41 elastic01 shard.node 0b -
nodeattrs : 사용자 정의된 Node 속성 의 정보
GET _cat/nodeattrs node host ip attr value elastic01 elastic01 1.1.1.41 ml.machine_memory 67258183680 elastic01 elastic01 1.1.1.41 xpack.installed true elastic01 elastic01 1.1.1.41 ml.max_open_jobs 20 kibana01 kibana01 1.1.1.31 ml.machine_memory 33437409280 kibana01 kibana01 1.1.1.31 ml.max_open_jobs 20 kibana01 kibana01 1.1.1.31 xpack.installed true -
repositories : Cluster 의 snapshot repositories 정보
GET _cat/snapshots/{repository} id type -
templates : templates 정보
   GET _cat/template
        name                        index_patterns        order      version
  .monitoring-es              [.monitoring-es-7-*]          0          7000199
  .monitoring-alerts-7        [.monitoring-alerts-7]        0          7000199
  filebeat-7.0.0              [filebeat-7.0.0-*]            1          1
10. Elastic Search, Kibana rolling Upgrade (Ver. 7.0.0 -> 7.4.2)
- Upgrade 실행
- Upgrade Node의 Shard 할당 비할성화
PUT _cluster/settings { "persistent": { "cluster.routing.allocation.enable": "primaries" } }- 불필요한 색인 생성을 중지하고 동기화 된 플러시를 수행
POST _flush/synced- Node 종료
# systemctl stop elasticsearch- Node Upgrade
# yum bash elasticsearch- elasticsearch.yml 파일 수정
* Version Upgrade 로 일부 Option 변경 됨 - discovery.zen.ping.unicast.hosts => discovery.seed_hosts - discovery.zen.minimum_master_nodes => 없어짐 - transport.tcp.port (Default Port 9300) => transport.tcp.port: 9300 (Default Port 9400 변경되어 별도 옵션 추가)- Node 시작
# systemctl start elasticsearch * Mem Lock 설정을 (systemctl 등록시) /usr/lib/systemd/system/elasticsearch.service 내 아래 내용 추가 - LimitMEMLOCK=infinity * 최초 실행시 약 3분 ~ 5분 소요 * Keystore 생성 Error 발생 - Keystore 생성 디랙토리 권한이 root:elasticserch 및 750(rwxr-x---)으로 되어 있어 파일이 elasticsearch:elasticsearch 생성되지 않는 오류 발생 - /etc/elasticsearch 디렉토리 권한을 770(rwxrwx---) 변경 후 정상 Start 확인- Shard 할당 활성화
PUT _cluster/settings { "persistent": { "cluster.routing.allocation.enable": null } }- Node가 정상화 될때까지 대기
GET _cat/health?v GET _cat/recovery * Upgrade한 Node 의 Shard가 Unassigned 에서 Upgrade Node 로 넘어감 - 총 Shard 갯수 931개 완료시 약 30분 ~ 40분 소요-
나머지 Node 를 1번 부터 반복
-
Kibana Request Cluster 를 위한 Coordinate 적용
-
Kibana Upgrade
  - Coordinate Node 로 server.host 변경

  * Version Upgrade 에 따른 Config 변화 없음
댓글남기기